Importing and exporting your customers
From Spiffy Stores Knowledge Base
You are able to Export your customer data using CSV (Comma-Separated Values) or Excel spreadsheet files.
When exporting data, you can choose to either export your entire customer database, or you can filter your customer list using a saved custom search, and then export just the customers selected by the filters.
You can also Import new customers into your store using a CSV file.
This feature gives you the ability to perform a bulk import of customer records into your store, which is useful if you want to migrate an existing customer database from a previous system. It is also useful if you want to import the customer data that you have collected from other marketing efforts such as trade shows or email campaigns.
Contents
Exporting Customers
You will find all the export and import options on the Customers page, in the sidebar at the bottom.
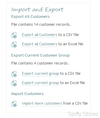
You will see three sections in the Import and Export box.
- Export All Customers
- Export Current Customer Group
- Import Customers
Each of the export sections indicates how many customer records will be included in the export file.
Choose Export All Customers if you want to select the entire customer database. You will find two links in that section offering you a choice to download either a CSV file or an Excel spreadsheet file.
The second section Export Current Customer Group will allow you to export only the customer records that have been filtered by the currently selected filters and tags. Again, you will find two links in that section offering you the choice to download either a CSV file or an Excel spreadsheet file.
Importing Customers
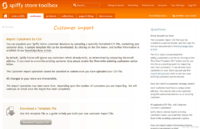
Select the Import more customers from a CSV file link to take you to the Customer Import page.
The Customer Import page contains some instructions on how to use the customer import process. In the side-bar are the answers to a number of commonly asked questions about importing customers.
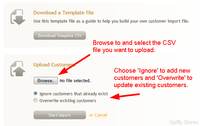
If you want a template CSV file to use to start building your customer import CSV file, then click on the Download Template CSV button.
Use the Browse button to select the CSV file you want to upload, then select to either Ignore existing customers or Overwrite existing customers, then click on the Start Import button.
This will submit your import for processing. You will be taken to an import status page, where you can wait for the import to complete, or continue working elsewhere until you are notified by email that the import has finished.
Note: The Credit field will always be ignored for existing customers. This field is only available when creating new customers.
Customer Export/Import File Format
Your CSV file needs to adhere to the following conventions in order for it to be used to import customers.
You can freely use UTF-8 character encodings for names and addresses, but be sure to create them using a Unicode or UTF-8 enabled program. The OpenOffice.org suite of programs is suitable for this purpose.
A CSV file (Comma-Separated Values) file is a plain text file with commas delimiting the fields. The first line of the CSV file is the header, and contains the name of the fields. The sample template CSV file can assist you with the correct heading values.
When exporting your customer data in either CSV or Excel spreadsheet format, the following fields will be included. The same fields are used when importing customer data in CSV format.
Title
First Name
Last Name
Email
Company
Address1
Address2
City
State
Country
Postcode
Phone
Accepts Marketing
Total Spent
Total Orders
Tags
Note
Wholesale
Credit
The fields are explained below.
The customers.csv file explained
| HEADER | WHAT IS IT? |
|---|---|
| Title (Optional) | The salutation for the customer. Valid values are Mr, Mrs, Miss, Ms, Mx, Dr, Prof, Sr, or Reverend. This field can also be left blank. |
| First Name | The customer's first name. |
| Last Name | The customer's last name. |
| The email address for the customer. If the customer has an account, then the email address must be unique, and two different account customers cannot share the same email address. | |
| Company (Optional) | The customer's company. |
| Address1 | The first address line. |
| Address2 (Optional) | The second address line. |
| City | The city or suburb of the address. |
| State (Optional) | The state or province of the address. This field does not use abbreviations, so the full name of the state or province will need to be specified. e.g. New South Wales. |
| Country | The country in which the customer is located. This field does not use abbreviations, so the full name of the country will need to be specified. e.g. Australia, or United States, or United Kingdom. |
| Postcode (Optional) | The postal code or zip code for the address. This field must be formatted according to the national standard for postal codes. |
| Phone | The contact phone number for the customer. |
| Accepts Marketing | TRUE or FALSE. |
| Total Spent (Optional) | The total amount spent by this customer. When importing new customers, this field can be used to import prior sales for the customer that can be used when calculating discount eligibility. |
| Total Orders | The total number of orders placed by this customer. When importing new customers, this field can be used to import prior sales for the customer that can be used when calculating discount eligibility. |
| Tags (Optional) | A string of tags to identify the customer, separated by commas. |
| Note (Optional) | Notes and comments associated with this customer. |
| Wholesale | TRUE or FALSE. |
| Credit | The total value of any store credit for this customer. Number to two decimal places. |


