Seattle theme: Customising your store's design
From Spiffy Stores Knowledge Base
The Seattle theme design can be edited in the "Design >> Theme editor" section of your toolbox. The Theme Editor allows you to edit just about every colour in your theme, as well as editing your slideshow and enabling or disabling social media functionality. Below is a guide detailing each of the sections in the theme editor;
Contents
Theme presets

The Seattle theme comes with 6 preset colour schemes. When you first load the theme, it is loaded using the "Natural brown & green" colour scheme. You can choose a colour scheme in this section, or you could also modify each section of your theme by editing other sections below.
The theme editor
The theme editor is broken up into sections to make it a litle easier to find things. Each section of the theme editor is devoted to either a specific set of functions, or a specific area of the page. Clicking on a section heading will expand the section out so you can see the options for that section. We'll go into more detail about each section below.
Important note: When you make a change in your theme editor, make sure you have a look at your storefront to see the result. You may need to click the refresh/reload button on your browser whilst holding down the shift key on your keyboard to see your changes, as they are sometimes cached by your computer.

Upload your Logo
Upload your logo so that it displays in the header of your theme, and also in the header of your checkout pages. To upload your logo, you tick the box that says "Use a logo?", and then click the "Choose file" button to select the file on your computer. When you've done that, you just click the "Save settings" button to upload your logo and have it display in your theme. Please note that the theme editor re-sizes your logo to a maximum size of 750 pixels wide x 150 pixels high so that it fits into the theme nicely. If you need that modified, please contact us to request a change to this.
Choose your top menu
Choose the menu that you want to appear in the header of your store. The menus that appear in this list are ones that have been created in the "Store menus" section of your toolbox. The theme uses the "Top Menu" by default. So when editing your menus, the Top Menu is the one you want to edit.
The top menu in your store header supports multi-level drop-down menus, so you can create new menu items that appear when you hover over items in the top of the tree. For more information about editing your store's menus, go to the "How to edit your store menus" page in this knowledge base.
Menu colours
Select the colours that you want to use in your menu. These should generally complement each other, and the Menu text colour should be able to be read over top of the menu background colour.
Other menus
The Seattle theme allows you to display two other menus on the left side of the page. You can enter titles for these menus, and choose the colour that you want them to display in. From experience, we recommend that you have one menu displaying your product collections, and a second menu displaying information pertinent to your visitors, such as your exchange policy, shipping policy, and contact details.
Colour scheme & fonts

Home page slide show & SEO

The Seattle theme features a slideshow on the home page, that can dispay up to 5 images. To customise the slideshow, you first choose how many images you want in your slideshow, choose the images you want to upload, and then click the "Save settings" button.
Any images you upload are automatically resized to fit the slideshow, so you will want to ensure that you upload images that are exactly 670px wide x 255px high so they don't appear stretched or squashed.
If you need help customising your slideshow, please contact us at support@spiffystores.com.au
Using Pixlr to create a slideshow image
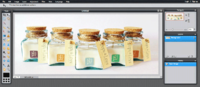
Pixlr editor

- Go to the Pixlr editor
- Click "Create a new image"
- Set the width to 670 and the height to 255, and click OK
- You now have your canvas to work within. You will need to explore the various tools and options. You can open your own images in Pixlr using "File -> Open image" in the Pixlr menu. You can then copy and paste your images into your slide. You need to make sure when you're doing this, that you don't stretch your images. You can do this by holding down the shift key when re-sizing.
- When your slide is looking gorgeous, save it by choosing "File -> Save" from the Pixlr top menu.
- Choose JPEG for your format, and set your quality to 80
- When you've saved the file to your computer, upload it in your theme editor.
Home page SEO
This section overrides the default Title and Description meta tags on the home page of your store. The title that you enter here and the description that you enter here are likely to show up in search results, so you should make them a punchy and succinct as possible.
Collection pages

When a product is on sale, or sold out, a small tag appears on collection pages to indicate this. generally the colour for the "Sold Out" tag should be dull, and the colour of the "On Sale" tage should be bright and stand out.
The "Product link text" is the text that is displayed under a product on your collection pages.
Product pages

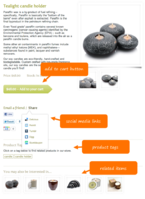
Seattle theme product page

Generally your "Add to cart button" should be as bright as your colour scheme allows.
An example of where product tags, related items, and the social media links are on the page is included in the image to the right.
We encourage all stores to enable the social media links in the product pages, as these allow your visitors to easily post your products on most of the major social media and sharing sites,
Your cart page

This section is pretty self-explanatory. Choose which payment methods you accept in your store. If you accept PayPal, you should generally tick "PayPal", "Visa", "Mastercard" and "Bank Deposit", as all of those payment methods are accepted when you use PayPal.
You can also choose the colours of the buttons on this page. Generally you would select a bright colour for your checkout button, and more subdues colours for other buttons.
Enabling Facebook blog comments & social media links

Enabling social media links will display a Facebook "Like" button, a Twitter "Tweet" button, and a Google +1 button on blog articles in your store.
You can also enable comments on your Blog articles to encourage involvement from your visitors. To do this, you will need to a Facebook account.
Although not essential, you can get a Facebook app ID for your store at http://developers.facebook.com/setup/ which will allow you to access the comments moderation area provided by Facebook at http://developers.facebook.com/tools/comments
The comments moderation area at http://developers.facebook.com/tools/comments is very handy, as it allows you to set some security preferences to stop spam comments... as your store could be filled with spammy comments in no time. You also shouldn't enable comments until you've added your domain name to your store, and provided that domain to Facebook when registering your "App".

Choose your menu
Selct the menu that you want to appear in your footer, and select it's colour.
Twitter link
If you have a Twitter account, enter the full address of your Twitter page here (including the http://) to enable the Twitter link in your footer. e.g. http://www.twitter.com/spiffystores
If you don't have a Twitter account, leave this field blank and the Twitter icon won't be displayed
Facebook link
If you have a Facebook account, enter the full address of your Facebook page here (including the http://) to enable the Facebook link in your footer. e.g. http://www.facebook.com/spiffystores
If you don't have a Facebook account, leave this field blank and the Facebook icon won't be displayed
Enable the RSS link to your blog?
If you want a link to your RSS feed to appear in your footer, select a blog. If you don't, select "None".
Enable the link to your newsletter subscribe form?
If you want a link to a form (such as one that you can set up with MailChimp) for subscribing to a newsletter, enter it here. Absolute links (e.g. http://www.newsletterservice.com ) will open in a new window. Relative links (e.g. /pages/newsletter ) will open in the same window.