Difference between revisions of "Importing a Shopify store"
From Spiffy Stores Knowledge Base
(Created page with "From the Home screen on your PayPal account, find the PayPal Checkout quick link. Alternatively, it's available from the '''Pay & get paid''' menu, under the '''Accept payment...") |
|||
| (3 intermediate revisions by the same user not shown) | |||
| Line 1: | Line 1: | ||
| − | + | When you decide to migrate your store to Spiffy Stores, we understand that you're keen to preserve us much as possible from your old Shopify store, and to make the migration as painless as possible. | |
| + | |||
| + | In order to achieve a painless migration, Spiffy Stores supports the import of Shopify Product export CSV files directly. There's no need to convert or edit the exported data. We support all of the Shopify data right out of the box. | ||
| + | |||
| + | However, in some cases, the CSV export file that Shopify provides doesn't really include as much information as you'd like. For example, they do not provide enough information to allow product collections to be re-created. | ||
| + | |||
| + | In order to provide a more comprehensive migration, we are offering a custom-built migration process that will re-build your Shopify store as fully as possible in your new Spiffy Store site. This option does require a little bit of setup at the Shopify end in order for us to access your store data. Once the setup process has been completed, we'll be able to process your data for you, and use it to build your new Spiffy Store. | ||
| + | |||
| + | At the moment, this option is provided for Shopify stores upon request. Just let us know what the Access Token is for your store, and we'll do the migration for you. | ||
| + | |||
| + | There is no charge for this service. | ||
| + | == Create a Shopify Custom App == | ||
<gallery heights="200px" widths="200px" class="right"> | <gallery heights="200px" widths="200px" class="right"> | ||
| − | File: | + | File:Shopify Import 1.png|Access Shopify Settings |
</gallery> | </gallery> | ||
| − | * 1. | + | * 1. From your Shopify administration screen, click on the '''Settings''' link. |
<br style="clear:both"> | <br style="clear:both"> | ||
<gallery heights="200px" widths="200px" class="right"> | <gallery heights="200px" widths="200px" class="right"> | ||
| − | File: | + | File:Shopify Import 2.png|Go to "Apps and sales channels" |
</gallery> | </gallery> | ||
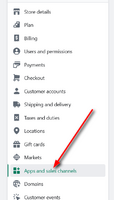
| − | * 2. | + | * 2. Within the '''Settings''', click on the '''Apps and sales channels''' link. |
<br style="clear:both"> | <br style="clear:both"> | ||
<gallery heights="200px" widths="200px" class="right"> | <gallery heights="200px" widths="200px" class="right"> | ||
| − | File: | + | File:Shopify Import 3.png|Develop apps |
</gallery> | </gallery> | ||
| + | * 3. Click on the '''Develop apps''' menu option. | ||
| + | <br style="clear:both"> | ||
| + | <gallery heights="200px" widths="200px" class="right"> | ||
| + | File:Shopify Import 4.png|Create an app | ||
| + | </gallery> | ||
| + | * 4. Click on the '''Create an app''' menu option. | ||
| + | <br style="clear:both"> | ||
| + | <gallery heights="200px" widths="200px" class="right"> | ||
| + | File:Shopify Import 5.png|Name the app | ||
| + | </gallery> | ||
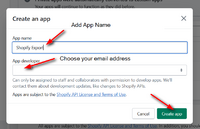
| + | * 5. Enter an app name. "Shopify Export" is a good choice. Also, from the available list of Shopify users, add your own email address as the app developer. Then click '''Create app''' when you're done. | ||
| + | <br style="clear:both"> | ||
| + | <gallery heights="200px" widths="200px" class="right"> | ||
| + | File:Shopify Import 6.png|Configure app scopes | ||
| + | </gallery> | ||
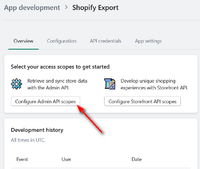
| + | * 6. The app now needs to be configured. It is necessary to grant permissions on what data can be accessed. This is done by clicking on '''Configure Admin API scopes'''. | ||
| + | <br style="clear:both"> | ||
| + | <gallery heights="200px" widths="200px" class="right"> | ||
| + | File:Shopify Import 7.png|Choose scopes | ||
| + | </gallery> | ||
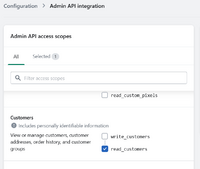
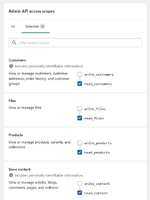
| + | * 7. The '''Admin API access scopes''' are shown as a list of available scopes. Scroll down through the list, and select the following permissions. ''read_customers'', ''read_files'', ''read_products'' and ''read_content''. | ||
| + | <br style="clear:both"> | ||
| + | <gallery heights="200px" widths="200px" class="right"> | ||
| + | File:Shopify Import 8.png|Review scopes | ||
| + | </gallery> | ||
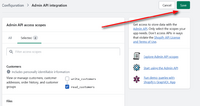
| + | * 8. Review all the scopes to ensure that the correct ones have been selected. | ||
| + | <br style="clear:both"> | ||
<gallery heights="200px" widths="200px" class="right"> | <gallery heights="200px" widths="200px" class="right"> | ||
| − | File: | + | File:Shopify Import 9.png|Save selected scopes |
</gallery> | </gallery> | ||
| + | * 9. Once all the correct scopes have been selected, click '''Save'''. | ||
| + | <br style="clear:both"> | ||
| + | <gallery heights="200px" widths="200px" class="right"> | ||
| + | File:Shopify Import 10.png|Install app | ||
| + | </gallery> | ||
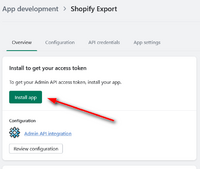
| + | * 10. Go back to the Overview and click '''Install app'''. | ||
| + | <br style="clear:both"> | ||
| + | <gallery heights="200px" widths="200px" class="right"> | ||
| + | File:Shopify Import 11.png|Confirm installation | ||
| + | </gallery> | ||
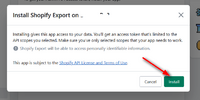
| + | * 11. Confirm that you want to install the app. | ||
| + | <br style="clear:both"> | ||
| + | <gallery heights="200px" widths="200px" class="right"> | ||
| + | File:Shopify Import 12.png|Reveal Access Token | ||
| + | </gallery> | ||
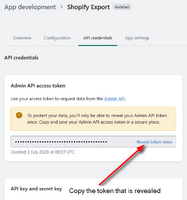
| + | * 12. Reveal the Admin API access token by clicking on '''Reveal token once'''. It is important to copy and save this token once it has been revealed. The token will never be available again after you leave this screen. Send a copy of the token to [mailto:support@spiffystores.com.au support@spiffystores.com.au] and include the name and address of your Shopify store. The name is the first part of the address before ''myshopify.com'' or copy the full url link of your admin page. For example, ''<nowiki>https://admin.shopify.com/store/??????/</nowiki>''. | ||
| + | <br style="clear:both"> | ||
Latest revision as of 12:44, 3 July 2023
When you decide to migrate your store to Spiffy Stores, we understand that you're keen to preserve us much as possible from your old Shopify store, and to make the migration as painless as possible.
In order to achieve a painless migration, Spiffy Stores supports the import of Shopify Product export CSV files directly. There's no need to convert or edit the exported data. We support all of the Shopify data right out of the box.
However, in some cases, the CSV export file that Shopify provides doesn't really include as much information as you'd like. For example, they do not provide enough information to allow product collections to be re-created.
In order to provide a more comprehensive migration, we are offering a custom-built migration process that will re-build your Shopify store as fully as possible in your new Spiffy Store site. This option does require a little bit of setup at the Shopify end in order for us to access your store data. Once the setup process has been completed, we'll be able to process your data for you, and use it to build your new Spiffy Store.
At the moment, this option is provided for Shopify stores upon request. Just let us know what the Access Token is for your store, and we'll do the migration for you.
There is no charge for this service.
Create a Shopify Custom App
- 1. From your Shopify administration screen, click on the Settings link.
- 2. Within the Settings, click on the Apps and sales channels link.
- 3. Click on the Develop apps menu option.
- 4. Click on the Create an app menu option.
- 5. Enter an app name. "Shopify Export" is a good choice. Also, from the available list of Shopify users, add your own email address as the app developer. Then click Create app when you're done.
- 6. The app now needs to be configured. It is necessary to grant permissions on what data can be accessed. This is done by clicking on Configure Admin API scopes.
- 7. The Admin API access scopes are shown as a list of available scopes. Scroll down through the list, and select the following permissions. read_customers, read_files, read_products and read_content.
- 8. Review all the scopes to ensure that the correct ones have been selected.
- 9. Once all the correct scopes have been selected, click Save.
- 10. Go back to the Overview and click Install app.
- 11. Confirm that you want to install the app.
- 12. Reveal the Admin API access token by clicking on Reveal token once. It is important to copy and save this token once it has been revealed. The token will never be available again after you leave this screen. Send a copy of the token to support@spiffystores.com.au and include the name and address of your Shopify store. The name is the first part of the address before myshopify.com or copy the full url link of your admin page. For example, https://admin.shopify.com/store/??????/.

