Difference between revisions of "How to configure Mac Mail on OSX"
From Spiffy Stores Knowledge Base
m |
m |
||
| Line 1: | Line 1: | ||
| − | === | + | === Setting Up Mac Mail on OS X === |
| − | + | This tutorial will help you to configure Mac Mail on OS X to access your Spiffy Stores email account. | |
| − | [[ | + | For other email software, refer to [[How to set up your email program to access your Spiffy Stores mailboxes]] |
| − | + | ''Note:'' In these instructions, ''yourstore'' refers to the name given to your Spiffy Store, and this is the name that appears in your spiffystores.com domain name. For example, if your store is called '''sellmore''', then your Spiffy Stores domain name will be '''sellmore.spiffystores.com'''. | |
| − | + | '''To set up Mac Mail:''' | |
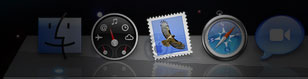
| − | + | # To open Mail, click its icon in the Dock or browse to the Mail application inside "Macintosh HD" then "Applications".<br><br>[[Image:Mac-mail-01.jpg]]<br><br>If this is the first time you have set up Mail, you will be prompted to set up a new Mail account, if you are, skip to step 3, otherwise please continue to step 2. | |
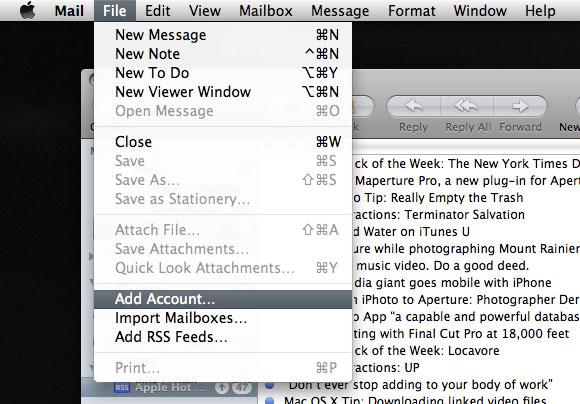
| − | + | # Go to the "File" menu at the top then select "Add Account".<br><br>[[Image:Mac-mail-02.jpg]]<br><br> | |
| − | Go to the "File" menu at the top then select "Add Account". | + | # Mail will ask for some details. Type in your full name, your email address and the password that you set when you created your mailbox. When you're finished, click the "Continue" button.<br><br>'''Note: ''' If you're using your own domain name, you can enter the email address here that you want people to see when you send email to them. For example, if your custom domain is "joeswidgets.com" and you've set up an account for "joe@joeswidgets.spiffystores.com", you can still just enter "joe@joeswidgets.com".<br><br>[[Image:Mac-mail-03.jpg]]<br><br> |
| − | + | # Mail should automatically choose POP as the account type. This is correct. If it doesn't, you will need to select POP.<br><br>Set the Incoming mail server to "mail.spiffystores.com".<br><br>Your username should be your full Spiffy Stores email address as it appears in your store toolbox on the "Preferences >> Email Accounts" page, e.g. "joe@joeswidgets.spiffystores.com", and the password should automatically carry over from the previous page. If it does not, simply retype it in the password field.<br><br>Click "Continue". Mail will then attempt to verify your settings by logging in. If you are not connected to the Internet, you'll get an error, which you should ignore at this point.<br><br>[[Image:Mac-mail-04.jpg]]<br><br> | |
| − | [[Image:Mac-mail-02.jpg]]<br> | + | # Tick the box labelled use "Secure Sockets Layer".<br><br>Ensure that "Password" is selected in the "Authentication" drop-down box and click "Continue".<br><br>[[Image:Mac-mail-05.jpg]]<br><br> |
| − | + | # Set the outgoing mail server to "mail.spiffystores.com".<br><br>Ensure "Use only this server" is '''un-ticked''' and "Use authentication" is '''ticked'''.<br><br>In the "User Name" field, enter your full Spiffy Stores email address as it appears in your store toolbox on the "Preferences >> Email Accounts" page, e.g. "joe@joeswidgets.spiffystores.com".<br><br>The password should automatically carry over from the previous page. If it does not, simply retype it in the password field. Click "Continue" to proceed.<br><br>[[Image:Mac-mail-06.jpg]]<br><br> | |
| − | + | # Tick the box labelled use "Secure Sockets Layer".<br><br>Ensure that "Password" is selected in the "Authentication" drop-down box and click "Continue".<br><br>[[Image:Mac-mail-07.jpg]]<br><br> | |
| − | + | # You will be presented with a final summary of the details you have entered to confirm they are correct. The screen below shows an example of correct details.<br><br>If you're happy with your details, click "Create" to commit them.<br><br>[[Image:Mac-mail-08.jpg]]<br><br> | |
| − | |||
| − | |||
| − | Mail will ask for some details. Type in your full name, your email address and the password that you set when you created your mailbox. When you're finished, click the "Continue" button. | ||
| − | |||
| − | '''Note: ''' | ||
| − | |||
| − | [[Image:Mac-mail-03.jpg]]<br> | ||
| − | |||
| − | |||
| − | |||
| − | |||
| − | |||
| − | Mail should automatically choose POP as the account type. This is correct. If it doesn't, you will need to select POP. | ||
| − | |||
| − | Set the Incoming mail server to mail | ||
| − | |||
| − | Your username should be your full Spiffy Stores | ||
| − | |||
| − | Click "Continue". Mail will then attempt to verify your settings by logging in. If you are not connected to the Internet, you'll get an error, which you should ignore at this point. | ||
| − | |||
| − | [[Image:Mac-mail-04.jpg]]<br> | ||
| − | |||
| − | |||
| − | |||
| − | |||
| − | |||
| − | |||
| − | |||
| − | Ensure that "Password" is selected in the "Authentication" drop-down box and click "Continue". | ||
| − | |||
| − | [[Image:Mac-mail-05.jpg]]<br> | ||
| − | |||
| − | |||
| − | |||
| − | |||
| − | |||
| − | Set the outgoing mail server to mail | ||
| − | |||
| − | Ensure "Use only this server" is '''un-ticked''' and "Use authentication" is '''ticked'''. | ||
| − | |||
| − | In the " | ||
| − | |||
| − | [[Image:Mac-mail-06.jpg]]<br> | ||
| − | |||
| − | |||
| − | |||
| − | |||
| − | |||
| − | |||
| − | |||
| − | Ensure that "Password" is selected in the "Authentication" drop-down box and click "Continue" | ||
| − | |||
| − | [[Image:Mac-mail-07.jpg]]<br> | ||
| − | |||
| − | |||
| − | |||
| − | |||
| − | |||
| − | You will be presented with a final summary of the details you have entered to confirm they are correct. The screen below shows an example of correct details. | ||
| − | |||
| − | If you're happy with your details, click "Create" to commit them. | ||
| − | |||
| − | [[Image:Mac-mail-08.jpg]]<br> | ||
| − | |||
| − | <br> | ||
==== <br> STEP 9 - TEST YOUR SETTINGS ==== | ==== <br> STEP 9 - TEST YOUR SETTINGS ==== | ||
Revision as of 14:30, 13 March 2013
Contents
Setting Up Mac Mail on OS X
This tutorial will help you to configure Mac Mail on OS X to access your Spiffy Stores email account.
For other email software, refer to How to set up your email program to access your Spiffy Stores mailboxes
Note: In these instructions, yourstore refers to the name given to your Spiffy Store, and this is the name that appears in your spiffystores.com domain name. For example, if your store is called sellmore, then your Spiffy Stores domain name will be sellmore.spiffystores.com.
To set up Mac Mail:
- To open Mail, click its icon in the Dock or browse to the Mail application inside "Macintosh HD" then "Applications".
If this is the first time you have set up Mail, you will be prompted to set up a new Mail account, if you are, skip to step 3, otherwise please continue to step 2. - Go to the "File" menu at the top then select "Add Account".
- Mail will ask for some details. Type in your full name, your email address and the password that you set when you created your mailbox. When you're finished, click the "Continue" button.
Note: If you're using your own domain name, you can enter the email address here that you want people to see when you send email to them. For example, if your custom domain is "joeswidgets.com" and you've set up an account for "joe@joeswidgets.spiffystores.com", you can still just enter "joe@joeswidgets.com".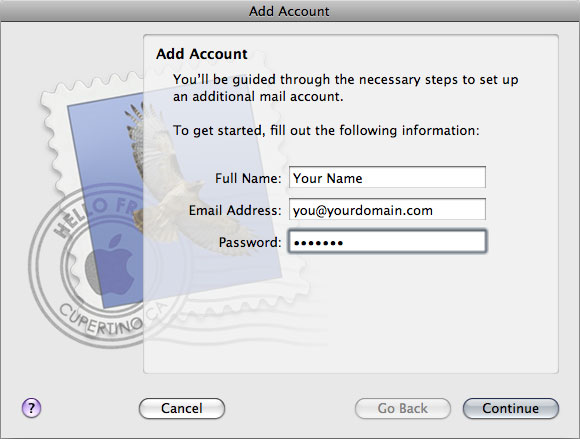
- Mail should automatically choose POP as the account type. This is correct. If it doesn't, you will need to select POP.
Set the Incoming mail server to "mail.spiffystores.com".
Your username should be your full Spiffy Stores email address as it appears in your store toolbox on the "Preferences >> Email Accounts" page, e.g. "joe@joeswidgets.spiffystores.com", and the password should automatically carry over from the previous page. If it does not, simply retype it in the password field.
Click "Continue". Mail will then attempt to verify your settings by logging in. If you are not connected to the Internet, you'll get an error, which you should ignore at this point.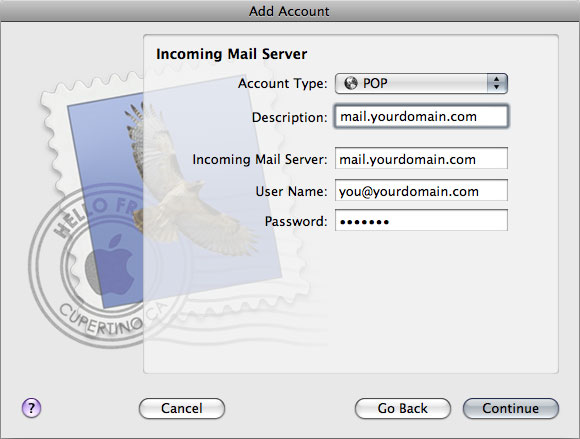
- Tick the box labelled use "Secure Sockets Layer".
Ensure that "Password" is selected in the "Authentication" drop-down box and click "Continue".
- Set the outgoing mail server to "mail.spiffystores.com".
Ensure "Use only this server" is un-ticked and "Use authentication" is ticked.
In the "User Name" field, enter your full Spiffy Stores email address as it appears in your store toolbox on the "Preferences >> Email Accounts" page, e.g. "joe@joeswidgets.spiffystores.com".
The password should automatically carry over from the previous page. If it does not, simply retype it in the password field. Click "Continue" to proceed.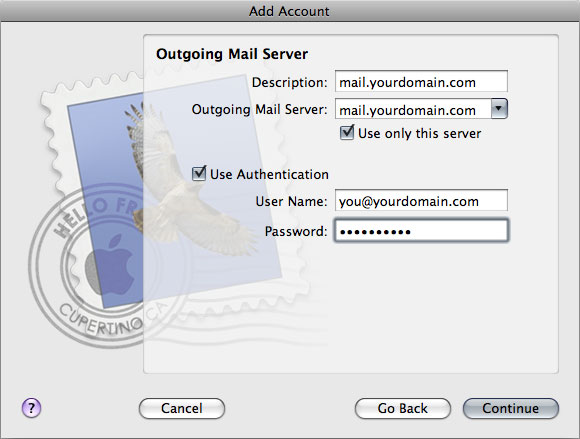
- Tick the box labelled use "Secure Sockets Layer".
Ensure that "Password" is selected in the "Authentication" drop-down box and click "Continue".
- You will be presented with a final summary of the details you have entered to confirm they are correct. The screen below shows an example of correct details.
If you're happy with your details, click "Create" to commit them.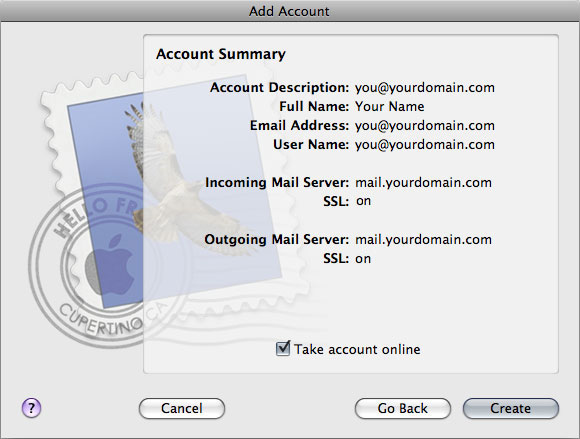


STEP 9 - TEST YOUR SETTINGS
For many people, your account should now be working. Try sending yourself an email, and if it sends OK, and you receive it in your inbox, you can stop here. If you have problems sending, please try the following steps before contacting us for support;
STEP 10
Go to "Mail" in the menu, and choose "Preferences".

STEP 11
Go to the accounts tab, and select the account that you're setting up on the left (In the "Accounts" section). Under the "Account Information" section, choose "Edit Server List..." in the drop-down where your outgoing server is listed.

STEP 12
Ensure the domain is selected in the list above, and select "Use custom port", then type in "587" into the box.
Ensure that "Use Secure Sockets Layer (SSL)" is turned off, that authentication is set to "Password", and that your email address and password are typed in correctly. When finished, click OK.

STEP 13
Back on the accounts screen, retype your password again in the "Password" field in the incoming mail server section. This is important, as mail actually forgets your password for your incoming mail server, when you set the password for your outgoing mail server.
STEP 14
Close the accounts window, making sure that you save any changes if prompted to do so.