Difference between revisions of "SwipeHQ Checkout Payment Gateway"
From Spiffy Stores Knowledge Base
| Line 1: | Line 1: | ||
| − | <html><iframe frameborder="0" width="160px" height="600px" style="overflow:hidden;padding:0px; margin:0px; float: right;" scrolling="no" src="http://partners.optimizerhq.com/stream/?q=c_4|p_SpiffyInternetServices56|a_38"></iframe></html> | + | <html><iframe frameborder="0" width="160px" height="600px" style="overflow:hidden;padding:0px; margin:0px; float: right; padding-left: 20px;" scrolling="no" src="http://partners.optimizerhq.com/stream/?q=c_4|p_SpiffyInternetServices56|a_38"></iframe></html> |
Becoming a Swipe HQ Checkout merchant is really simple. For just a $99 setup fee and no monthly fees or contracts, you can apply online for a merchant account. Assuming Swipe HQ receive all the information from you before 2pm on a business day, it takes 5-7 working days to have your merchant account ready for use. Here’s how the process works: | Becoming a Swipe HQ Checkout merchant is really simple. For just a $99 setup fee and no monthly fees or contracts, you can apply online for a merchant account. Assuming Swipe HQ receive all the information from you before 2pm on a business day, it takes 5-7 working days to have your merchant account ready for use. Here’s how the process works: | ||
Revision as of 12:12, 5 December 2013
Becoming a Swipe HQ Checkout merchant is really simple. For just a $99 setup fee and no monthly fees or contracts, you can apply online for a merchant account. Assuming Swipe HQ receive all the information from you before 2pm on a business day, it takes 5-7 working days to have your merchant account ready for use. Here’s how the process works:
Online Application: Depending on the type of business you are (company, sole trader, partnership, charity etc.), you will need to supply relevant information to help the Swipe HQ merchant support team process your application. Along with all your contact information, Swipe HQ require 2 forms of identification and may require a statement of financial position (at their discretion) to take your application to the next step.
Merchant Verification: Being part of the payments industry means Swipe HQ have to comply with certain governmental rules around collecting and verifying information about their merchants. Shortly after applying for a merchant account you will receive a phone call from their merchant support team to go through the verification process over the phone. At this stage, the Swipe HQ merchant support team will discuss your application and get to understand the nature of your business, allowing them to make an informed decision about your application. When applying online, make sure you have your bank account deposit slip, driver’s license (or passport), and a proof of address ready to scan and upload to Swipe HQ to speed up the verification process.
Merchant On Boarding Process: Within 3 days of the verification process, Swipe HQ will contact you again by email and phone to confirm your acceptance as a the Swipe HQ Checkout merchant along with relevant login details and resources.
At that stage, you are ready to start accepting credit card payments, and can follow the steps below to activate the Swipe HQ in your Spiffy Store.
For more information about Swipe HQ, visit their web site at https://www.swipehq.com/
Contents
Activating the Swipe HQ Payment Gateway
The Swipe HQ Payment gateway can be activated in the "Preferences -> Checkout & Payment" section of your Spiffy Store Toolbox.
Before you begin
You will need your Merchant Email and API Key to set up the gateway. This information is available from Swipe HQ from within the Merchant Console under Settings.
Activating the Gateway
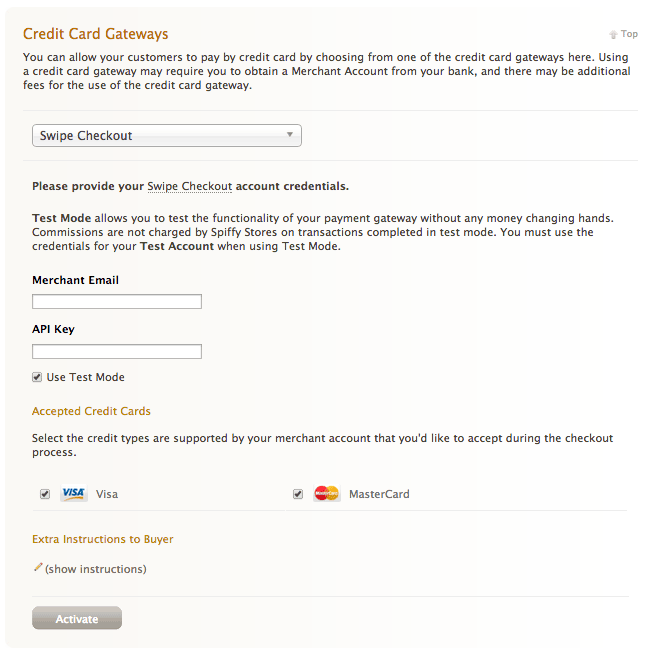
To activate the Swipe HQ gateway, go to the "Preferences -> Checkout & Payment" section of your Spiffy Store Toolbox and follow the instructions below.
To activate the Swipe HQ gateway, go to the "Preferences -> Checkout & Payment" section of your Spiffy Store Toolbox and follow the instructions below.
- Scroll down to the "Credit Card Gateways" section.
- Choose "Swipe Checkout" in the drop-down select menu
- Enter your Swipe HQ Merchant Email and API Key
- Ensure that Visa and MasterCard are both Ticked
- Choose whether you want to set the Gateway to "Test mode" so you can place test orders. If you choose test mode, ensure that you come back and edit the settings for the gateway to turn off test mode when you're ready to launch!
- Click the "Activate" button.
It's as easy as that!
About Swipe HQ
Swipe is positioned as a hub for simplified payment solutions for businesses and organizations of all shapes, sizes and flavours. Our focus is to take credit card processing and general payment processing out of the ‘transactional’ box and add an extended perspective.
What is that perspective? The link between transactions and what happens before, during and after a payment processing transaction. There's a strong connection between how Jane Doe comes to your website or physical store, what outcome you get (a sale or no sale) and how you should go about treating that encounter in the future. With Optimizer HQ's power-packed suite of products, finding, winning, keeping and growing high-value customers is now all the more integrated, thanks to Swipe, the ‘so far’ missing link in Optimizer HQ's stable of products.
We designed Swipe to give all those small business owners, in-home service providers, independent contractors and retailers, who never had a transactional facility (due to the high cost and hassle), the ability to increase their revenue potential by accepting credit card payments at super low rates.
Whether you're Hamish the landscaping franchise owner, Jenny the hair stylist, Rob the taxi driver, or Emma the retail store owner, Swipe is for you.
For more information about Swipe HQ, visit their web site at https://www.swipehq.com/
