Difference between revisions of "MYOB AccountRight App Configuration"
From Spiffy Stores Knowledge Base
m (→Manual Exports) |
m (→Manual Exports) |
||
| Line 88: | Line 88: | ||
<gallery heights="200px" widths="200px" class="right"> | <gallery heights="200px" widths="200px" class="right"> | ||
| − | File:Myob access8. | + | File:Myob access8.jpg|Manual Export |
</gallery> | </gallery> | ||
Revision as of 14:38, 10 September 2018
MYOB (https://www.myob.com.au) is an Australian company that develops a wide range of software products, including accounting, payroll, payments, retail point of sale, CRM and professional tax solutions.
MYOB is designed in Australia, for local businesses, working with the ATO so you're always up-to-date.
Contents
Installing the App
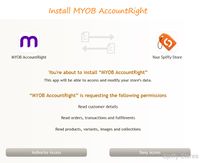
You can access your installed Apps or install new Apps from the apps tab in your main toolbar.
Logging On
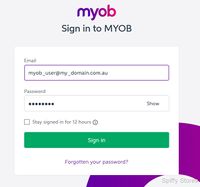
When you log in for the first time, you will need to provide your my.MYOB credentials.
In order to access your Company File using your my.MYOB credentials, you will need to ensure that you configure your user access to use your signon using your my.MYOB account. Your AccountRight access can be managed in the Setup -> User Access screen. Tick the option to sign on with a my.MYOB account, and enter the associated email address you want to use. Save the settings, and you'll now be able to access your Company File through the online AccountRight Live API.
When you install the app for the first time, you will be prompted to approve the permissions that the app is requesting.
Authenticating with your my.MYOB Account
After approving the permissions that the app requires, you will need to connect to my.MYOB to authorize the installation. This authorization will give the app access to your MYOB AccountRight Company File so that it can import the order data.
At this point, you need to enter your my.MYOB:
- Email Address
- Password
Setting up Company Data
Once you have successfully authenticated with your my.MYOB account, the app will load the account data it needs from your Company File.
Initial Configuration
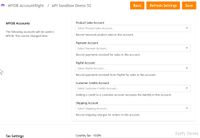
The MYOB AccountRight App must be configured before it can be used, in order to map the MYOB accounts to the exported data.
The Settings page consists of a number of sections.
- MYOB Accounts
- Map MYOB Accounts to your store data
- Tax Settings
- Select correct tax setting for your sales
- Customer Export Settings
- Choose whether to export customer data
- Export Settings
- Email Notifications and Automatic Daily Export
You should probably ask your Accountant about the account mappings. You may need to add new accounts to MYOB, but your Accountant will be able to advise you about this.
Similarly, your Accountant will make sure that all of the correct Tax Codes have been defined for you, and will be able to assist you to choose the correct mappings for your store.
You can choose to include individual customer data with each order as it is exported to MYOB. Alternatively, you can choose to export all orders under a single generic customer if you don't want to include this data in your accounting software.
By default, the app will export your paid orders to MYOB and create a paid Invoice for the order.
In some cases, you may wish to export all new orders to MYOB and treat them as Orders within the MYOB software. If payments have been made for the order, then this will be exported to MYOB as well. These MYOB Orders may subsequently be converted to paid Invoices and recorded as received payments within the accounting software.
Furthermore, an option for posting order data in real-time is also available. If you choose to send order data to MYOB immediately, then whenever an order is created, it is immediately posted to MYOB as an Order or an Invoice as desired. Additionally, when a payment for the order is processed, the payment information will also be send to MYOB immediately and recorded against the original Order or Invoice that was created earlier.
Finally, if you provide an email address, you can be sent an export summary after each export run. You can also specify that an automatic export will take place every day after midnight to export the previous day's orders.
Finally, click Save to save your settings.
Manual Exports
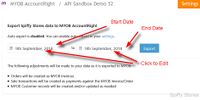
You can choose to manually export all paid orders to MYOB by clicking on each of the date fields to select a date range and then click on the Export button.
All orders that have been paid within this date range will be selected for export. Test orders will not be exported. Please note that the order will only be exported if the payment date for the order falls within the nominated date range. The date that the order was created is not relevant.
The export job may take a short time to complete, and a progress bar is displayed so that you can track the completion of the export job.
Once the export job has finished, a link will appear at the bottom that can be used to view the completed status of the export job. Additionally, if you have enabled email notifications, you will be sent a summary of the export job.
Automatic Exports
If you enable the Automatically Export Daily option in your App settings, then an export job will be run every day at some time after midnight in your local time zone. The job will automatically export all paid orders from the date of the last export job up until the day previous to the export job being run.
