Creating a data feed for Rakuten LinkShare
From Spiffy Stores Knowledge Base
Revision as of 11:19, 22 May 2014 by Shawn (talk | contribs) (→Customisable variables in the tracking Pixel)
Setting up a product data feed for your products is a great way to get added exposure for your online store by syndicating them to a variety of these shopping portals.
Product data feeds are updated whenever you make a change to your products, so you can be sure that they're up to date. To create a data feed for Rakuten LinkShare follow the instructions below.
IMPORTANT!
You need to ensure that all of your products have a SKU (Stock Keeping Unit) before submitting your data file to LinkShare. If you don't do this, they will not accept your submission!
Contents
Step 1 - Create a collection of products
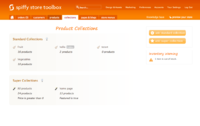
Firstly we need to have a list of products to send to LinkShare. To create this, you'll need to create a collection that contains all of the products you want in your data feed. You can create a Standard Collection or a Super Collection. This can be done in the "Collections" section of your store's Toolbox.
If you already have created a collection for another provider (for example Shopping.com), or you just want to have all of your products in your feed, you can skip this step.
Step 2 - Creating your data feed
After you have created your collection, go to the
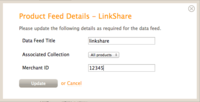
"Marketing -> Product data feeds" section of your store's Toolbox, and click the "Activate" button in the LinkShare section.
- Enter a name for your feed. It's not used anywhere except for your reference
- Select the collection you created in Step 1
- Enter your Merchant ID that has been provided to you by LinkShare
- Click the "Activate" button
LinkShare currently requires that you upload a text file. Once you have created your file, it is updated every time to make a change to your products, so you may need to manually upload your file every few weeks.
To access the feed, go to the "Marketing -> Product data feeds" section of your store's Toolbox, and click on the URL for LinkShare. You will be prompted to download the file, and you can then upload it to LinkShare.
To add in a tracking pixel for LinkShare, you'll need to copy the code below, and paste it into the field titled "Additional Content & Scripts" that you'll find in the "Preferences -> Checkout & payment" section of your stores' Toolbox.
Make sure you replace "MERCHANTID" on the first line with the Merchant ID that LinkShare have provided you with.
{% capture mid %}MERCHANTID{% endcapture %}
{% capture ord %}{{ order_number | url_encode }}{% endcapture %}
{% capture skulist %}{% for item in line_items %}{{ item.sku | url_encode }}{% if forloop.last %}{% else %}|{% endif %}{% endfor %}{% endcapture %}
{% capture qlist %}{% for item in line_items %}{{ item.quantity }}{% if forloop.last %}{% else %}|{% endif %}{% endfor %}{% endcapture %}
{% capture amtlist %}{% for item in line_items %}{% if line.taxable %}{{ item.line_price | divided_by: 1.1 | times: 100 | money_rounded }}{%else %}{{ item.line_price | times: 100 | money_rounded }}{% endif %}{% if forloop.last %}{% else %}|{% endif %}{% endfor %}{% endcapture %}
{% capture cur %}{{ shop.currency }}{% endcapture %}
{% capture namelist %}{% for item in line_items %}{{ item.title | url_encode }}{% if forloop.last %}{% else %}|{% endif %}{% endfor %}{% endcapture %}


<img src="https://track.linksynergy.com/ep?mid={{ mid }}&ord={{ ord }}&skulist={{ skulist }}&qlist={{ qlist }}&amtlist={{ amtlist }}&cur={{ cur }}&namelist={{ namelist }}">
Customisable variables in the tracking Pixel
- Merchant ID
Make sure you replace "MERCHANTID" on the first line with the Merchant ID that LinkShare have provided you with. - Tax amount
As LinkShare require that prices are reported excluding tax, you may also need to adjust the tax rate for your products if you are outside Australia. This can be changed by changing the "divided_by" amount in this example.

