Xero App Configuration
From Spiffy Stores Knowledge Base
Xero (https://www.xero.com) is an New Zealand-owned company that develops online accounting software. It uses the software as a service distribution model. Xero has offices in Australia, New Zealand, United Kingdom, United States, and Singapore.
Xero capabilities include sales, purchasing, inventory, payroll, CRM, point of sale, document and workflow management, global search and tagging.
Contents
Installing the App
You can access your installed Apps or install new Apps from the apps tab in your main toolbar.
Logging On
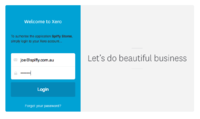
When you log in for the first time, you will need to provide your Xero account credentials to authorise your store to connect to Xero.
You will need to provide
- Account Email Address
- Account Password
Multiple Xero Organisations
Xero have upgraded their login process, and it is now possible to connect to the same Xero account from multiple stores. It is also possible to connect to multiple organisations from the one Xero account.
If you have multiple organisations connected to your Xero signin, then you will need to specifically link your Xero Organisation to the correct Spiffy Store. This can be done as follows:
- Click on the Organisation drop-down at the top left-hand side of the Xero screen.
- From there, you can click on the Settings menu to access the settings for that organisation.
- Select Organisation details.
- At the bottom of the page, you'll find a Website field.
- Enter your store website address, using your spiffystores.com domain name. For example, "https://mystore.spiffystores.com". Do not use your own custom domain name. This is the domain name that you use to access your store admin.
- Save the update.
If you do not specify the website here, your store will be connected to the first Xero organisation that is found. The name of the connected organisation is displayed at the top left of the Xero App screen in your Spiffy Stores admin.
Initial Configuration
The Xero App must be configured before it can be used, in order to map the Xero accounts to the exported data.
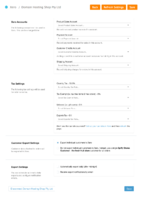
The Settings page consists of a number of sections.
- Xero Accounts
- Map Xero Accounts to your store data
- Tax Settings
- Select correct tax setting for your sales
- Customer Export Settings
- Choose whether to export customer data
- Export Settings
- Email Notifications and Automatic Daily Export
You should probably ask your Accountant about the account mappings. You may need to add new accounts to Xero, but your Accountant will be able to advise you about this.
Similarly, your Accountant will make sure that all of the correct Tax Codes have been defined for you, and will be able to assist you to choose the correct mappings for your store.
You can choose to include individual customer data with each order as it is exported to Xero. Alternatively, you can choose to export all orders under a single generic customer if you don't want to include this data in your accounting software.
Finally, if you provide an email address, you can be sent an export summary after each export run. You can also specify that an automatic export will take place every day after midnight to export the previous day's orders.
Finally, click Save to save your settings.
Manual Exports
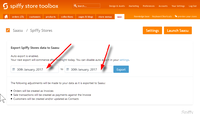
You can choose to manually export all paid orders to Xero by clicking on each of the date fields to select a date range and then click on the Export button.
All orders that have been paid within this date range will be selected for export. Test orders will not be exported. Please note that the order will only be exported if the payment date for the order falls within the nominated date range. The date that the order was created is not relevant.
The export job may take a short time to complete, and a progress bar is displayed so that you can track the completion of the export job.
Once the export job has finished, a link will appear at the bottom that can be used to view the completed status of the export job. Additionally, if you have enabled email notifications, you will be sent a summary of the export job.
Automatic Exports
If you enable the Automatically Export Daily option in your App settings, then an export job will be run every day at some time after midnight in your local time zone. The job will automatically export all paid orders from the date of the last export job up until the day previous to the export job being run.
Has the app disconnected from Xero?
Unfortunately, Xero sometimes make changes that can break apps that are connected. To reconnect follow the process below.
- Log in to Xero on the Xero site
- Go to Organisation Settings
- Disconnect Spiffy Stores
- Lo in to your Store's admin area
- Go to the Apps tab, and remove the Xero app
- Re-install the Xero app and reconnect it to Xero


