Difference between revisions of "Asking your customer for additional information"
From Spiffy Stores Knowledge Base
| (23 intermediate revisions by 2 users not shown) | |||
| Line 1: | Line 1: | ||
| − | ==Methods that do not require | + | ==Methods that do not require template modifications== |
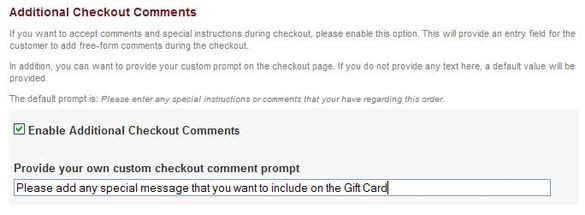
You can ask a customer more information at checkout time by enabling the "Additional Checkout Comments" option on the "Preferences->Checkout & Payment" page in your Toolbox. | You can ask a customer more information at checkout time by enabling the "Additional Checkout Comments" option on the "Preferences->Checkout & Payment" page in your Toolbox. | ||
| + | This enables a text box on the second page of the checkout, and you can customize the heading to provide specific instructions for your customers. | ||
| − | + | <gallery heights="585px" widths="585px" align="center"> | |
| − | + | Image:Cart info3.jpg|From the "Preferences -> Checkout & Payment" Page | |
| − | + | </gallery> | |
| − | |||
Any message that the customer enters will be attached to the order and displayed at the top of the order when you view it in the Toolbox. | Any message that the customer enters will be attached to the order and displayed at the top of the order when you view it in the Toolbox. | ||
| + | This method of collecting additional information from the customer does not require any template modifications, and can be enabled or disabled at any time from the Toolbox. | ||
| − | + | <gallery heights="585px" widths="585px" align="center"> | |
| − | + | Image:Cart info4.jpg|Checkout Page 2 | |
| + | </gallery> | ||
| − | + | If you need to add fields to products without editing code, check out [[Infinite Options]]. | |
| − | ==Methods that require | + | ==Methods that DO require template modifications== |
When you update the content of a cart or click the checkout button on a standard [[Cart.liquid|cart.liquid]] page, the store code will look for two special parameters called '''note''' and '''attributes''' | When you update the content of a cart or click the checkout button on a standard [[Cart.liquid|cart.liquid]] page, the store code will look for two special parameters called '''note''' and '''attributes''' | ||
| − | ===Adding a Text Note=== | + | ===Adding a Text Note to your shopping cart page=== |
The '''note''' parameter is the easiest to use. You can use this to add a free-form text note to the cart before checkout. | The '''note''' parameter is the easiest to use. You can use this to add a free-form text note to the cart before checkout. | ||
| Line 36: | Line 38: | ||
This will produce a cart page that looks something like this: | This will produce a cart page that looks something like this: | ||
| − | + | <gallery heights="585px" widths="585px" align="center"> | |
| − | + | Image:Cart info1.jpg | |
| − | + | </gallery> | |
After the order has been placed, the note will display at the top of the page when you view the order in the Toolbox. | After the order has been placed, the note will display at the top of the page when you view the order in the Toolbox. | ||
| + | <gallery heights="585px" widths="585px" align="center"> | ||
| + | Image:Cart info2.jpg | ||
| + | </gallery> | ||
| − | + | === Cart Attributes === | |
| − | |||
| − | ===Cart Attributes=== | ||
Attributes let you attach any value to an order by choosing a name for it. They are very useful for creating more complex forms with checkboxes, drop-downs or even hidden fields which just attach the browser version or operating system of the client to the order. | Attributes let you attach any value to an order by choosing a name for it. They are very useful for creating more complex forms with checkboxes, drop-downs or even hidden fields which just attach the browser version or operating system of the client to the order. | ||
| − | You choose the name of the attribute using the html name property in the form "attributes[name]". | + | You choose the name of the attribute using the html ''name'' property in the form "attributes[name]". |
<pre><input type="checkbox" name="attributes[wrapping]" id="wrapping" value="yes" /></pre> | <pre><input type="checkbox" name="attributes[wrapping]" id="wrapping" value="yes" /></pre> | ||
| Line 63: | Line 66: | ||
</p></pre> | </p></pre> | ||
| + | This generates a checkout page that looks like this: | ||
| + | |||
| + | <gallery heights="585px" widths="585px" align="center"> | ||
| + | Image:Cart info5.jpg | ||
| + | </gallery> | ||
| − | + | After the order has been placed, the following note will appear with the order. | |
| + | <gallery heights="585px" widths="585px" align="center"> | ||
| + | Image:Cart info6.jpg | ||
| + | </gallery> | ||
| − | + | You can add as many attributes as you like as long as you choose unique names. | |
| + | |||
| + | ==== Cart Attributes in Liquid Templates ==== | ||
| + | These cart attributes are also available in the Customer '''Order.liquid''' template so that you can display the values that have been chosen when the order was created. | ||
| − | + | <pre> | |
| + | {% for attribute in order.attributes %} | ||
| + | <p> Key: {{ attribute.first }} - Value: {{ attribute.last }}</p> | ||
| + | {% endfor %} | ||
| + | </pre> | ||
| + | Also an attribute can be accessed directly, using the same key as was used in the cart template. | ||
| − | + | <pre> | |
| + | <p>The child's name is: {{ order.attributes.child_name }}</p> | ||
| + | </pre> | ||
| − | ===Line Item Notes=== | + | === Line Item Notes === |
Finally, a custom note may be added to individual product line items. This will allow you to provide custom information on product basis. | Finally, a custom note may be added to individual product line items. This will allow you to provide custom information on product basis. | ||
| Line 81: | Line 102: | ||
To allow the customer to specify custom product information, add the following to the [[Product.liquid|product.liquid]] template. | To allow the customer to specify custom product information, add the following to the [[Product.liquid|product.liquid]] template. | ||
| − | <pre><p> | + | <pre> |
| + | <form action="/cart/add" method="post"> | ||
| + | ... | ||
| + | <p> | ||
<label for="note">Add custom text for logo:</label><br/> | <label for="note">Add custom text for logo:</label><br/> | ||
| − | <textarea name="note" cols="60" rows="2 | + | <textarea id="note" name="note" cols="60" rows="2" style="width: 100%"></textarea> |
| − | </p></pre> | + | </p> |
| + | ... | ||
| + | </form> | ||
| + | </pre> | ||
| + | |||
| + | Note: This code fragment must appear in between the <form> and </form> tags in the liquid file. | ||
The custom information will then appear for each item in the cart. | The custom information will then appear for each item in the cart. | ||
| + | In some cases, you may not want this input field to appear on all your products. In this case, you can add some additional code to test what type of product is being displayed. | ||
| + | |||
| + | Here is an example of the code you could use to display an input text field only if the product belongs to the 'sample' product collection, where 'sample' is the handle of the collection. | ||
| − | + | <pre> | |
| + | <form action="/cart/add" method="post"> | ||
| + | ... | ||
| + | {% capture collections %}{{ product.collections | map: 'handle' }}{% endcapture %} | ||
| + | {% if collections contains 'sample' %} | ||
| + | <p>Enter your text here:</p> | ||
| + | <textarea id="note" name="note" rows="5" cols="60" style="width: 100%"></textarea> | ||
| + | {% endif %} | ||
| + | ... | ||
| + | </form> | ||
| + | </pre> | ||
| + | <gallery heights="585px" widths="317px" align="center"> | ||
| + | Image:Cart info7.jpg | ||
| + | </gallery> | ||
After the order has been placed, the custom line item note will appear underneath each line item description when viewing the order in the Toolbox. | After the order has been placed, the custom line item note will appear underneath each line item description when viewing the order in the Toolbox. | ||
| + | <gallery heights="585px" widths="585px" align="center"> | ||
| + | Image:Cart info8.jpg | ||
| + | </gallery> | ||
| + | |||
| + | === Line Item Properties === | ||
| + | |||
| + | Sometimes you need to create more detailed customization information for your products, and a simple line item note is not sufficient for the task. | ||
| + | |||
| + | Line Item Properties allow you to create multiple, ''tagged'' notes for your product which give you more detailed information about the customer's needs. | ||
| + | |||
| + | Following on from our previous example, if we want to get the custom data used for the logo, then we can add the following snippet to the '''product.liquid''' template. | ||
| + | <pre> | ||
| + | <form action="/cart/add" method="post"> | ||
| + | ... | ||
| + | <p> | ||
| + | <label for="logo_text">Add custom text for logo:</label><br> | ||
| + | <textarea id="logo_text" name="properties[logo]" cols="60" rows="2" style="width: 100%"></textarea> | ||
| + | </p> | ||
| + | ... | ||
| + | </form> | ||
| + | </pre> | ||
| + | |||
| + | In this case, we have used a '''name''' of <code>properties[logo]</code> on the input field. This will create a ''logo'' property for the line item. | ||
| − | + | You can create and name line item properties in any way you want, and you can retrieve and display each of the line item properties using the '''line_item.properties''' Liquid array variable. | |
Latest revision as of 13:55, 12 July 2021
Contents
Methods that do not require template modifications
You can ask a customer more information at checkout time by enabling the "Additional Checkout Comments" option on the "Preferences->Checkout & Payment" page in your Toolbox.
This enables a text box on the second page of the checkout, and you can customize the heading to provide specific instructions for your customers.
From the "Preferences -> Checkout & Payment" Page

Any message that the customer enters will be attached to the order and displayed at the top of the order when you view it in the Toolbox.
This method of collecting additional information from the customer does not require any template modifications, and can be enabled or disabled at any time from the Toolbox.
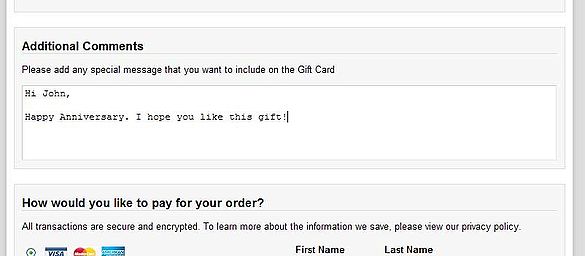
Checkout Page 2

If you need to add fields to products without editing code, check out Infinite Options.
Methods that DO require template modifications
When you update the content of a cart or click the checkout button on a standard cart.liquid page, the store code will look for two special parameters called note and attributes
Adding a Text Note to your shopping cart page
The note parameter is the easiest to use. You can use this to add a free-form text note to the cart before checkout.
For example, if you are running a gift shop, you may want to ask your customers for a gift message to be included in the package.
Add following html/liquid code to your cart.liquid before the </form> tag:
<p>
  <label for="note">Gift note:</label><br/>
  <textarea name="note" id="note" rows="2" cols="60" style="width: 100%">{{cart.note}}</textarea>
</p>
This will produce a cart page that looks something like this:

After the order has been placed, the note will display at the top of the page when you view the order in the Toolbox.

Cart Attributes
Attributes let you attach any value to an order by choosing a name for it. They are very useful for creating more complex forms with checkboxes, drop-downs or even hidden fields which just attach the browser version or operating system of the client to the order.
You choose the name of the attribute using the html name property in the form "attributes[name]".
<input type="checkbox" name="attributes[wrapping]" id="wrapping" value="yes" />
In this example, we want to ask the customer if they require gift wrapping and to specify the name to be printed on the t-shirt.
<p>
  <input type="checkbox" name="attributes[wrapping]" id="wrapping" value="yes"{% if cart.attributes.wrapping %} checked="checked"{% endif %} />
  <label for="wrapping">Please wrap the products in this order</label>
</p>
<p>
  <label for="name">Child's name: </label><input type=text name="attributes[name]" id="name" value="{{ cart.attributes.name }}"/>
</p>
This generates a checkout page that looks like this:

After the order has been placed, the following note will appear with the order.

You can add as many attributes as you like as long as you choose unique names.
Cart Attributes in Liquid Templates
These cart attributes are also available in the Customer Order.liquid template so that you can display the values that have been chosen when the order was created.
 {% for attribute in order.attributes %}
   <p> Key: {{ attribute.first }} - Value: {{ attribute.last }}</p>
 {% endfor %}
Also an attribute can be accessed directly, using the same key as was used in the cart template.
<p>The child's name is: {{ order.attributes.child_name }}</p>
Line Item Notes
Finally, a custom note may be added to individual product line items. This will allow you to provide custom information on product basis.
To allow the customer to specify custom product information, add the following to the product.liquid template.
<form action="/cart/add" method="post">
...
<p>
  <label for="note">Add custom text for logo:</label><br/>
  <textarea id="note" name="note" cols="60" rows="2" style="width: 100%"></textarea>
</p>
...
</form>
Note: This code fragment must appear in between the <form> and </form> tags in the liquid file.
The custom information will then appear for each item in the cart.
In some cases, you may not want this input field to appear on all your products. In this case, you can add some additional code to test what type of product is being displayed.
Here is an example of the code you could use to display an input text field only if the product belongs to the 'sample' product collection, where 'sample' is the handle of the collection.
<form action="/cart/add" method="post">
...
{% capture collections %}{{ product.collections | map: 'handle' }}{% endcapture %}
{% if collections contains 'sample' %}
  <p>Enter your text here:</p>
  <textarea id="note" name="note" rows="5" cols="60" style="width: 100%"></textarea>
{% endif %}
...
</form>

After the order has been placed, the custom line item note will appear underneath each line item description when viewing the order in the Toolbox.

Line Item Properties
Sometimes you need to create more detailed customization information for your products, and a simple line item note is not sufficient for the task.
Line Item Properties allow you to create multiple, tagged notes for your product which give you more detailed information about the customer's needs.
Following on from our previous example, if we want to get the custom data used for the logo, then we can add the following snippet to the product.liquid template.
<form action="/cart/add" method="post">
...
<p>
  <label for="logo_text">Add custom text for logo:</label><br>
  <textarea id="logo_text" name="properties[logo]" cols="60" rows="2" style="width: 100%"></textarea>
</p>
...
</form>
In this case, we have used a name of properties[logo] on the input field. This will create a logo property for the line item.
You can create and name line item properties in any way you want, and you can retrieve and display each of the line item properties using the line_item.properties Liquid array variable.