Difference between revisions of "Enabling PayPal Checkout"
From Spiffy Stores Knowledge Base
| Line 129: | Line 129: | ||
== Part 3 - Enable PayPal Checkout in your Spiffy Store == | == Part 3 - Enable PayPal Checkout in your Spiffy Store == | ||
| − | |||
Your PayPal account is now ready to connect to your Spiffy Store. You now need to follow the steps below to enable PayPal in your store. | Your PayPal account is now ready to connect to your Spiffy Store. You now need to follow the steps below to enable PayPal in your store. | ||
# Log in to your Spiffy Store Toolbox | # Log in to your Spiffy Store Toolbox | ||
| − | # Go to the "Checkout & | + | # Go to the "Checkout & Payment" page in the Preferences section |
| − | # In the PayPal section at the top, choose "PayPal | + | # In the PayPal section at the top, choose "PayPal Checkout" |
| − | # | + | # Go back to your PayPal account window and copy either the '''API Key''' or '''Client ID''' value to the clipboard. |
| − | # | + | # Back on your Spiffy Store window, Paste this value (Ctrl-V Windows or Command-V Mac) into the '''Client ID''' field. |
| − | # | + | # Return to your PayPal account window and copy the '''Secret''' value to the clipboard. |
| − | + | # Back on your Spiffy Store window, Paste this value (Ctrl-V Windows or Command-V Mac) into the '''Secret''' field. | |
# Click the "Activate" button. | # Click the "Activate" button. | ||
| − | After you've followed the steps above, your Spiffy Store should now be set up to accept payments through PayPal | + | After you've followed the steps above, your Spiffy Store should now be set up to accept payments through PayPal Checkout. To verify that it's all working, go to your store, add a product to your cart. |
The PayPal Express icon is displayed on your cart page. Clicking this button takes you through the steps of paying with PayPal Express. To view the PayPal Website payments Standard process, click the "Checkout" button (not the PayPal button) and proceed through to the last page of the checkout. The PayPal option should appear at the bottom of page 2 of the checkout. | The PayPal Express icon is displayed on your cart page. Clicking this button takes you through the steps of paying with PayPal Express. To view the PayPal Website payments Standard process, click the "Checkout" button (not the PayPal button) and proceed through to the last page of the checkout. The PayPal option should appear at the bottom of page 2 of the checkout. | ||
Revision as of 14:45, 28 June 2023
PayPal Checkout adds PayPal as a payment method in your checkout. When the customer chooses PayPal as the payment option, they will click on the PayPal button which will create a modal dialog box enabling the customer to login to their PayPal account, or pay by credit card as a guest. From their PayPal account, the customer may also be presented with the option to choose Pay In 4 if they wish to make the purchase using PayPal's "buy now, pay later" scheme.
Once the payment has been confirmed from within PayPal, the dialog box is dismissed and the checkout continues by creating and processing the order. The order will be marked as paid, and the customer will receive an order notification email.
Note, this behaviour differs from the earlier PayPal payment methods such as Website Payments Standard, where a payment could be abandoned leaving an unpaid order in the system. PayPal Checkout, instead, only creates an order once payment has been confirmed by the customer.
In order to use PayPal Checkout, you will need to have a PayPal Business account. If you don't have a PayPal Business account, click here to sign up for a PayPal account, and then return to this page.
Contents
Part 1 - Configure your PayPal Account
When you've set up your PayPal account, follow the steps below to configure access to your PayPal account.
Include Shipping charges from your store
Configure PayPal Shipping

Configure PayPal Shipping

Allow Shipping Override

You need to configure PayPal to include the shipping charges that are calculated by your store.
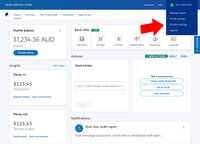
- Log in to manage your PayPal account
- Click on "Account settings" under Settings icon in the top menu.
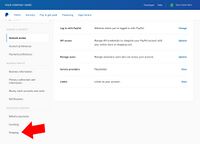
- Click on "Shipping" under "Solutions & Services".
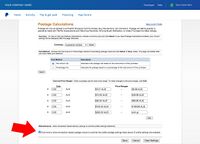
- In the "Shipping calculations" area, click "Update".
- Tick the box that says "Click here to allow transaction-based postage values to override the profile postage settings listed above (if profile settings are enabled)"
- Click the "Save" button
Accept payments from customers without a PayPal account
Configure PayPal Website Preferences

Enable PayPal Account Optional

You can allow your customer to make payments using PayPal even if they don't have their own PayPal account. Unfortunately all Paypal transactions processed in this method are not protected by PayPal's seller protection... so there is a risk of fraudulent transactions.
- Log in to manage your PayPal account
- Click on "Account settings" under Settings icon in the top menu.
- Click on "Website payments" under "Solutions and Services".
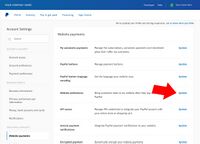
- Click on "Update" under "Website preferences".
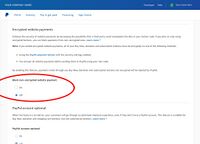
- Select the option that enables "PayPal Account Optional"
- Click the "Save" button
Automatic Return at the end of the transaction
Configure PayPal Website Preferences
Enable Auto Return

Once a customer has made their payment using PayPal, a confirmation message is displayed and the customer is prompted to click a link to return to your store. If the customer does not click on this link, then any tracking code that you have installed will not be triggered and your site statistics may not correctly reflect the actual number of orders that have been processed.
You should enable the "Auto Return" feature in PayPal so that the customer is automatically redirected back to your store once the transaction has been completed.
- Log in to manage your PayPal account
- Click on "Account settings" under Settings icon in the top menu.
- Click on "Website payments" under "Solutions & Services".
- Click "Update" on "Website preferences".
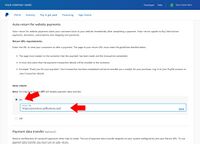
- Select the option that enables "Auto Return"
- Enter your store's web address as the "Return URL". For example, http://mystore.spiffystores.com.
Encrypted website payments
Turn off encrypted payments

The encrypted website payments option is only applicable when you use PayPal Payment Buttons. This payment method is not applicable to your Spiffy Store, as we use a direct, fully-encrypted method of connecting to PayPal which is not related to PayPal Payment Buttons. This means that you should set the Block non-encrypted website payment option to Off.
- Log in to manage your PayPal account
- Click on "Account settings" under Settings icon in the top menu.
- Click on "Website payments" under "Solutions & Services".
- Click "Update" on "Website preferences".
- Scroll down to "Encrypted website payments".
- Select "Off" for the "Block non-encrypted website payment" option.
Part 2 - Generate your PayPal Checkout Credentials
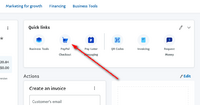
From the Home screen on your PayPal account, find the PayPal Checkout quick link. Alternatively, it's available from the Pay & get paid menu, under the Accept payments section.
Add PayPal Checkout

- 1. Click on the PayPal Checkout button or menu link.
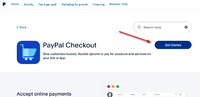
PayPal Checkout Get Started

- 2. You'll be directed to an information page about PayPal Checkout. Once you're ready to continue, click the Get Started button.
Choose Custom-Built Site

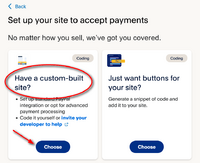
- 3. Choose the "Have a custom-built site?" option. Click the Choose button to continue.
Choose Integration

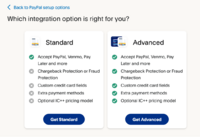
- 4. Next, you are offered the choice between a Standard or an Advanced integration option. We'd recommend choosing the Advanced option as it gives you access to more advanced features such as Fraud Protection. You may need to provide additional information about your business to qualify for this, so for smaller merchants, the Standard option may be sufficient. Make a choice, and click on the appropriate button.
Upgrade Business Account

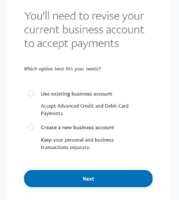
- 5. Depending upon your PayPal account, if you choose the Advanced Integration option, you may be asked to upgrade your account and provide some additional business information.
API Credentials

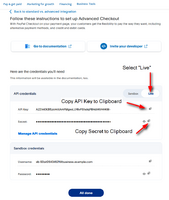
- 6. After providing this information, a set of API credentials will be generated for you and they will be shown once your account is ready.
- Make sure you select the Live credentials.
- Keep this window open and proceed to Part 3. You will need to copy both the API Key and the Secret into your Spiffy Store configuration screen.
- If you have previously activated PayPal Checkout, your credentials may not appear here. If this is the case, click on Manage API Credentials to be redirected to the Developer Dashboard, where you can view the API Credentials for your account.
Developer Dashboard

- 7. In the Developer Dashboard, ensure that the Live credentials are selected. Click on the Apps & Credentials menu item.
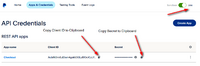
Apps & Credentials

- 8. In the API Credentials section, find the default app for your account. There should be only one app listed, and its name may vary from the example shown.
- Make sure you select the Live credentials.
- Keep this window open and proceed to Part 3. You will need to copy both the Client ID and the Secret into your Spiffy Store configuration screen.
Part 3 - Enable PayPal Checkout in your Spiffy Store
Your PayPal account is now ready to connect to your Spiffy Store. You now need to follow the steps below to enable PayPal in your store.
- Log in to your Spiffy Store Toolbox
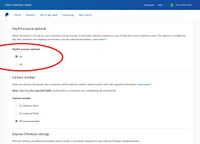
- Go to the "Checkout & Payment" page in the Preferences section
- In the PayPal section at the top, choose "PayPal Checkout"
- Go back to your PayPal account window and copy either the API Key or Client ID value to the clipboard.
- Back on your Spiffy Store window, Paste this value (Ctrl-V Windows or Command-V Mac) into the Client ID field.
- Return to your PayPal account window and copy the Secret value to the clipboard.
- Back on your Spiffy Store window, Paste this value (Ctrl-V Windows or Command-V Mac) into the Secret field.
- Click the "Activate" button.
After you've followed the steps above, your Spiffy Store should now be set up to accept payments through PayPal Checkout. To verify that it's all working, go to your store, add a product to your cart.
The PayPal Express icon is displayed on your cart page. Clicking this button takes you through the steps of paying with PayPal Express. To view the PayPal Website payments Standard process, click the "Checkout" button (not the PayPal button) and proceed through to the last page of the checkout. The PayPal option should appear at the bottom of page 2 of the checkout.