Difference between revisions of "Products"
From Spiffy Stores Knowledge Base
m |
m |
||
| Line 1: | Line 1: | ||
<html> | <html> | ||
<div> | <div> | ||
| − | <video width="640" height="480" poster="/kb/images/6/69/Screencast_poster.jpg"> | + | <video id="video" width="640" height="480" poster="/kb/images/6/69/Screencast_poster.jpg"> |
<source type="video/h264" src="/kb/images/6/60/Creating_a_product.m4v"> | <source type="video/h264" src="/kb/images/6/60/Creating_a_product.m4v"> | ||
</video> | </video> | ||
Revision as of 15:22, 15 September 2010
If you can't see the video above, you can also view it on Youtube
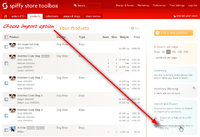
The Products section is where you can see all the products that populate your ecommerce store. You can add new items here, and organise the product list using the controls on the sidebar. If you want to see how much of each product you have in stock, the sidebar also has a link to your inventory overview
Contents
Adding New Products

Adding a new product

After clicking the Add new product link, just fill in the appropriate fields with your product information and hit the Save product button. In order to be easily accessible to your customers, a product then needs to be "added to a collection" which is "linked from within your shop".
The only fields that you absolutely have to fill in before saving your product are Title, Product type, and Product Vendor, but you'll almost certainly want to enter more information than that.
Hints for Adding New Products
Here are some tips for entering product information:
- SKU (Stock keeping unit): An SKU is a unique identifier for each of your product entries and "variants" which you can use to better organise your inventory. You don't have to use SKU numbers, but they can be very helpful especially if your inventory gets to be large. There are a number of different ways you can write SKUs, but you should stick to the same format for each of your products.
- I have a limited number of this item in stock: If this option is checked, it means you want to keep track of how many individual products of this type you have available to sell. If you know that you will always have stock easily available for sale, then you can safely leave this option unchecked. Otherwise, it's a good idea to keep track of your stock even if it doesn't take you long to make more of the product available.
- Deny/allow out-of-stock purchases: This choice should depend on how much time it takes you to restock. If you are selling glossy prints of a painting that you just finished, for example, you could allow people to always order more because the prints don't take you long to make. On the other hand, you would probably want to restrict people from ordering any more rare packages of baseball cards from the 1950s if you've just sold the last one you have.
- Tag your item: Customers can find products with particular tags using your store's search page, and they can use tags to filter any "collection" views that are "linked to" in your store. You have complete control over how you want to tag each product: a pair of jeans could be tagged with "classic blue denim," or instead with "casual rugged pants," or you could use all of these. One important thing to remember is that you should reuse tags between products as much as possible by using your list of existing tags. You probably don't want to end up with a "tshirts" tag and a "t-shirt" tag, for instance, because your customers would have to select both of them in order to see all of your t-shirts in a given collection. In fact, you may want to limit the number of tags in your ecommerce store to just a handful for each of your main collections so that your customers don't get overwhelmed by options. More information on using tags with collections can be found on the collections tab help page".
- Weight: This is used to calculate shipping costs, so it's good to be as accurate as possible.
- Compare at price: If you want to brag about how much better your prices are compared to your competition, you can use this field to tell your customers just how much those swindlers are charging for the same product. Alternatively, you could use your compare at price to represent your "regular" price when you want to put a product on sale. You will need to make sure that the "theme" you are using displays the compare at price in such a way that it expresses the intended meaning.
The units of measurement and form of currency used by the new product form are set automatically depending on the country selected during account creation, but the defaults can be changed in your General Settings area.
Editing your product information
After adding a new product to your online store or by clicking on the product's icon in the main product list, you are able to edit any aspect of the item. In addition to the things you can change when first adding the product, there are a couple of new options which aren't available on the add product, such as reordering product images.
Product Variations
Variations could represent different sizes of a piece of clothing, different strains of sunflower seed, or different sizes of computer monitor. Each variant has its own prices, weight, and inventory record, but they all share the same product page which lets the customer choose which one they want to buy. You can only add variants in the product management screen, after you have added the product.
You can always decide to create a new own product for every variation of this product, but this can result in a lot of time wasted for your customers as they browse your ecommerce store looking for exactly what they want. It's all up to you, but a good rule of thumb for many stores is to group products as variants when a single product description could fit for all of them.
If your variants have visual characteristics which distinguish them from one another, then you may want to add an image to your product for each variant so that your customers can see exactly what they're going to get.
Image Management
To entice people to buy your product, you should upload at least 1 or 2 photos of the product. For best results, images should be re-sized before uploading. As a general guide, images that are about 1280 pixels wide on their longest side are the best size to upload, as they are faster to upload, and still display as large images when people view them in your online store. Spiffy Stores automatically re-sizes images to fit in different areas of your store, as in some cases a smaller image is needed (like on collection pages), and other times a larger image is needed (like on a product page).
You are able to drag and drop each of your product's images to put them in any order you like. The first image is labeled as "featured" and will be displayed more prominently on the product page in most themes, and will also display on any collection pages.
Bulk Product Export and Import
You are able to Export and Import your store products using CSV (Comma-Separated Values) files. This feature gives you the ability to perform a bulk import of new products into your store, or to update product attributes such as prices and inventory levels. The update capability is useful if you need to keep your store prices synchronized with an inventory management system, or if you have a large number of products and need an easier method for maintaing them.
Exporting Products

Choosing the Export Products option

Select the Export all products link on the Products page to download a CSV file containing all of the products in your online store. This file can be used as a backup for your product data, or as a template which you can modify to create an update CSV file to modify your product data.
Please refer to the following section on Importing Products for details on the format of the CSV file.
Importing Products
Choosing the Import Products option

Select the Import more products link to go to the Product Import page.
Product Import Page
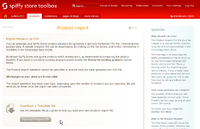
Product Import page

The Product Import page contains some instructions on how to use the product import process. In the side-bar are the answers to a number of commonly asked questions about importing products.
If you want a template CSV file to use to start building your product update CSV file, then click on the Download Template CSV button.

Select the CSV file to import

Your CSV file needs to adhere to the following conventions in order for it to be used to import products.
You can freely use UTF-8 character encodings for product titles and product descriptions, but be sure to create them using a Unicode or UTF-8 enabled program. The OpenOffice.org suite of programs is suitable for this purpose.
A CSV file (Comma-Separated Values) file is a plain text file with commas delimiting the fields. The first line of the CSV file is the header, and contains the name of the fields. The sample template CSV file can assist you with the correct heading values.
The first line of the CSV file must have the following heading columns.
Handle
Title
Body
Vendor
Type
Tags
Option1 Name
Option1 Value
Option2 Name
Option2 Value
Option3 Name
Option3 Value
Variant SKU
Variant Grams
Variant Inventory Tracker
Variant Inventory Qty
Variant Inventory Policy
Variant Fulfillment Service
Variant Price
Variant Compare At Price
Variant Discount
Variant Instalments
Custom Option Name
Custom Option Value
Custom Option Price
Image Src
The fields are explained below.
- Handle
- The product handle is a unique identifier for a given product. The handle is used as part of the product's URL to identify that product. In the CSV file, each line must contain a Handle or Title. If the Handle is not provided, one is automatically generated from the Title.
- This option is usually used when importing new products. For referencing existing products, it is necessary to specify the Handle of the product. A product definition may take a number of records in the CSV file, and each of these lines will contain the product's Handle. When a different Handle is encountered, a new product is being defined.
- The handle consists of lower-case letters and digits separated by dashes ('-'). No special characters or spaces are permitted. The handle must be unique for each product.
- Title
- The product's title.
- Body
- The product's description. This field may contain Textile markup codes. It may also include UTF-8 characters.
- Vendor
- The name of the product's vendor.
- Type
- The product type.
- Tags
- This is a comma-separated list of tags used to tag the product.
- Option1 Name
- This is the name of the default option that is used to distinguish a product's variations. For products with only single option, this should be left as 'Title'. A value MUST be provided if a variation is being defined.
- Option1 Value
- This is the value used to distinguish between a product variations. A value MUST be provided if a variation is being defined.
- Option2 Name
- If a product has a second option used to distinguish a product's variations, then enter the name of the option here.
- Option2 Value
- If a product has a second option, enter the value of the option for this variation here.
- Option3 Name
- If a product has a third option used to distinguish a product's variations, enter the name of the option here.
- Option3 Value
- If a product has a third option, enter the value of the option for this variation here.
- Variant SKU
- This is the SKU (Stock Keeping Unit) identifier used to identify the variation.
- Variant Grams
- This is the weight of the product variation. If your store uses metric weights, then this is the weight in grams. Alternatively if your store uses imperial weights, this is the weight in 1000ths of a pound.
- Variant Inventory Tracker
- This specifies how the tracking of inventory is managed. Valid values are "spiffy" or blank
- Variant Inventory Qty
- This is the number if items in stock for this variation.
- Variant Inventory Policy
- This specifies how to handle orders when inventory level for this variation reaches zero. Valid values are "deny", "continue" and "archive".
- Variant Fulfillment Service
- This determines how the product is fulfilled and if a fulfilment service is being used. Valid values are "manual", "shipwire", "webgistix" and "amazon".
- Variant Price
- This is the price of the product variation.
- Variant Compare at Price
- This is the compare at price for the product variation. It is used to provide a comparison price to show the amount of discount that is being offered.
- Variant Discount
- This is a discount price for a variation that can be used in conjunction with Shopping Cart discounts.
- Variant Instalments
- Payment for a product may be offered in instalments. This field specifies the number of payments required for the variation. Note, it is the store owner's responsibility to bill the customer for all instalment payments after the first.
- Custom Option Name
- This field defines the name of a Custom Option.
- Custom Option Value
- This field add a value for a Custom Option.
- Custom Option Price
- This field specifies the additional price for a Custom Option Value.
- Image Src
- Since images cannot be placed directly into a CSV file, you can sepecify the URL of an image to be attached to the product definition. Spiffy Stores will download the image during the import from the server specified by the URL. Images must be hosted on a publicly accessible web site, and cannot be uploaded directly from your computer by the CSV import method.
- You may not import images from your own Spiffy Store. Any such images will be ignored by the import process.
CSV File Usage Notes
The first record for a given handle must contain the product data section (Title, Body, Vendor, Type and Tags). Title, Vendor and Type must be specified.
Optionally this record and subsequent records with the same handle can contain Variant, Image and Custom Option records.
As many secondary handle records are included as necessary to list all possible variant, image or option records.
If the product is new, the first record must contain at least the product data, a variant record and optionally an image or option record. This and subsequent records will define the product and all its variants, images and options.
If the product is being updated, then the product data in the first record will replace the existing product data. The variant, image and option data are optional on the first record. If a variant, image or option is specified on the first record, then ALL existing variants, images or options are deleted and replaced by the data from the CSV file.
If there is no variant, image or option on the first record, but data appears on subsequent records, then these records are used to update or add new records. Thus, if there is no variant on the first record, but one appears on the second record, then this data replaces any existing variant with the same title or adds a new variant if it doesn't already exist.
The same rules apply to options, and also to images. However, for images all images are treated as new images and an attempt is made to upload them to the product.
If a product exists and the overwrite option is not specified, then the product is skipped entirely.
NOTE: If the first record does not contain product data, it will be skipped.
NOTE: Only the product data on the first record for a handle will be used. It will be ignored on all other records.
Policy for updates -
- If a product is new, then obviously all the data in the CSV will be added to the product.
- If a product already exists and the overwrite flag is not set, then the product will be skipped and no changes will be made to the product, its variants, options or images.
- If a product exists and overwrite is specified, then the main product attributes will be replaced. Also, all variants, options and images will be deleted and replaced by the ones specified in the CSV. This is equivalent to the product being deleted and replaced with a new version.
With the addition of the Option1, Option2 and Option3 fields, the variant title is replaced by up to three of these pption names (and values).
The Option Names are the titles of each of the options and are specified by "Option1 Name", "Option2 Name" and "Option3 Name". Only the values on the first record will be used when creating a product. All the names on subsequent lines are ignored, and are assumed to be the same as the first record. An error will be issued if the names change. When a product is being updated, then an error will be issued if the names do not exactly match the existing option names.
If you are using your CSV file to update variant data such as prices and inventory levels, then we'd recommend deleting the Image Src, Custom Option Name, Custom Option Value and Custom Option Price fields as these won't be changing your product images or custom options and it's not necessary to update them every time you make minor changes to the product and variation settings.
CSV File Examples
Identification Section
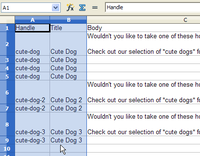
Handle Section in CSV File

The CSV file is divided into five main sections.
The first section consists of the first two columns, the Handle and the Title fields.
These two fields identify each product, and either a Handle or Title MUST be specified for each product. The values are repeated for every line of the product definition.
Product Section

Product Section in CSV File

The next section of the file contains the product description.
The four fields in this section include the Body, Vendor, Type and Tags fields.
This data is only required only on the FIRST record in a product definition. If any of these fields are specified on subsequent records for the product, they will be ignored.
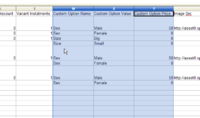
Variations Section

Variations Section in CSV File
The next 16 fields define each variation.
Each product variation requires one record in the CSV file, so include as many entries as necessary. Remember to include the Handle and/or Title fields for the product at the start of each record.
Custom Options Section
Custom Options Section in CSV File

The following 3 fields define all the custom options and their values.
An entry is required for each custom option name and each of the values and prices for that name. Each combination requires one product record, and you need to include as many records as necessary to define all custom option combinations.
It doesn't matter if you have more or less Custom Options than Variations. In the example on the right, there are 3 variations, but 4 custom options, so we need a total of 4 product records for the first product.
Images Section
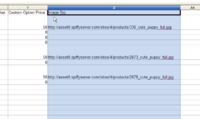
Images Section in CSV File

The final field defines the images for the product.
Each entry is the URL of the image on a web server. Each product image is listed on a single record. You need to include as many records as you have product images to define.
It doesn't matter if you have more or less Images than Custom Options or Variations. In the example on the right, there are 3 variations, 4 custom options, but only 1 image, so we need a total of 4 product records for the first product.