Difference between revisions of "Products"
From Spiffy Stores Knowledge Base
m |
|||
| (47 intermediate revisions by 2 users not shown) | |||
| Line 1: | Line 1: | ||
| + | The Products section is where you can see all the products that populate your ecommerce store. You can add new items here, and organise the product list using the controls on the sidebar. If you want to see how much of each product you have in stock, the sidebar also has a link to your inventory overview | ||
| + | |||
| + | === Adding New Products === | ||
| + | |||
<html> | <html> | ||
| − | <div> | + | <div style="padding:57.36% 0 0 0;position:relative;"><iframe src="https://player.vimeo.com/video/572809888?badge=0&autopause=0&player_id=0&app_id=58479" frameborder="0" allow="autoplay; fullscreen; picture-in-picture" allowfullscreen style="position:absolute;top:0;left:0;width:100%;height:100%;" title="add si mple product 001"></iframe></div><script src="https://player.vimeo.com/api/player.js"></script> |
| − | |||
| − | |||
| − | |||
| − | </ | ||
</html> | </html> | ||
| − | If you can't see the video above, you can also view it on [ | + | If you can't see the video above, you can also view it on [https://vimeo.com/572809888 Vimeo ] |
| − | |||
| − | |||
| − | |||
| − | |||
| − | |||
| − | |||
| − | |||
| − | |||
| − | |||
| − | |||
| − | |||
| − | After clicking the Add new product link, just fill in the appropriate fields with your product information and hit the Save product button. In order to be easily accessible to your customers, a product then needs to be "added to a collection" which is "linked from within your shop". | + | After clicking the "Add a new product" link, just fill in the appropriate fields with your product information and hit the Save product button. In order to be easily accessible to your customers, a product then needs to be "added to a collection" which is "linked from within your shop". |
| − | The only fields that you absolutely have to fill in before saving your product are Title, Product type, and Product Vendor, but you'll almost certainly want to enter more information than that. | + | The only fields that you absolutely have to fill in before saving your product are Title, Product type, and Product Vendor, but you'll almost certainly want to enter more information than that. You will also need to specify the price and weight for the default variation. |
| − | ==== Hints for Adding New Products | + | ==== Hints for Adding New Products ==== |
Here are some tips for entering product information: | Here are some tips for entering product information: | ||
| − | + | :; SKU (Stock keeping unit) | |
| − | + | :: An SKU is a unique identifier for each of your product entries and "variants" which you can use to better organise your inventory. You don't have to use SKU numbers, but they can be very helpful especially if your inventory gets to be large. There are a number of different ways you can write SKUs, but you should really stick to the same format for each of your products.<br><br>You can make up your own SKU's, but for data feeds it's sometimes best to use the barcode number on a product if that product comes with a bar code. | |
| − | + | :; Track this variation's stock level | |
| − | + | ::If this option is selected, it means you want to keep track of how many individual products of this type you have available to sell. If you know that you will always have stock easily available for sale, then you can choose "Don't track stock level" instead. Otherwise, it's a good idea to keep track of your stock even if it doesn't take you long to make more of the product available. | |
| − | + | :; Deny/allow out-of-stock purchases | |
| − | + | :: This choice should depend on how much time it takes you to restock. If you are selling glossy prints of a painting that you just finished, for example, you could allow people to always order more because the prints don't take you long to make. On the other hand, you would probably want to restrict people from ordering any more rare packages of baseball cards from the 1950s if you've just sold the last one you have. | |
| − | + | :; Tag your item | |
| − | + | :: Customers can find products with particular tags using your store's search page, and they are also used to display related items. You have complete control over how you want to tag each product: a pair of jeans could be tagged with "classic blue denim," or instead with "casual rugged pants," or you could use all of these. One important thing to remember is that you should reuse tags between products as much as possible by using your list of existing tags. <br><br>You probably don't want to end up with a "tshirts" tag and a "t-shirt" tag, for instance, because your customers would have to select both of them in order to see all of your t-shirts in a given collection. In fact, you may want to limit the number of tags in your ecommerce store to just a handful.<br><br>When entering your product tags, they should be separated by commas.<br><br>Product Tags are also used in the keyword meta tags for SEO purposes.". | |
| + | :; Weight | ||
| + | :: This is used to calculate shipping costs, so it's good to be as accurate as possible. | ||
| + | :; Original price | ||
| + | :: If you want to brag about how much better your prices are compared to your competition, you can use this field to tell your customers just how much those swindlers are charging for the same product. Alternatively, you could use your "Original price" to represent your "regular" price when you want to put a product on sale. You will need to make sure that the "theme" you are using displays the original price in such a way that it expresses the intended meaning. | ||
| + | :; Location Code | ||
| + | :: This optional field can be used to indicate where you store the item in your inventory. It may be something like a shelf or box number, or some other identifier that will enable you to find the item quickly. The packing list and order view will be sorted in location code order, so that all items located in the same location will appear together, making order fulfilment easier. | ||
| − | + | The units of measurement and form of currency used by the new product form are set automatically depending on the country selected during account creation, but the defaults can be changed in your "General Settings" page. | |
| − | + | == Formatting your content == | |
| − | === | + | <gallery heights="200px" widths="200px" class="right"> |
| + | Image:Spiffy-store-toolbox-textile-guide.png|Textile guide to formatting your content | ||
| + | </gallery> | ||
| − | + | We introduced a WYSIWYG editor in 2020, which makes it much easier to format your text. | |
| − | You can | + | You can also use HTML in the editor if you click the "Source Code" button. In the new editor, right click is disabled for copy & paste, so you'll need to use your computer's shortcut keys... |
| − | + | COPY SHORTCUT KEYS ARE CTRL C<br> | |
| + | PASTE SHORTCUT KEYS ARE CTRL V<br><br> | ||
| − | === | + | === Editing your product information === |
| − | + | After adding a new product to your online store or by clicking on the product's icon in the main product list, you are able to edit any aspect of the item. In addition to the things you can change when first adding the product, there are a couple of new options which aren't available on the add product, such as reordering product images. | |
| − | + | === Image Management === | |
| − | + | To entice people to buy your product, you should upload at least one or two photos of the product. For best results, images should be re-sized before uploading. As a general guide, images that are about 1280 pixels wide on their longest side are the best size to upload, as they are faster to upload, and still display as large images when people view them in your online store. Spiffy Stores automatically re-sizes images to fit in different areas of your store, as in some cases a smaller image is needed (like on collection pages), and other times a larger image is needed (like on a product page). | |
| − | You are able to | + | You are able to drag and drop each of your product's images to put them in any order you like. The first image is labeled as "featured" and will be displayed more prominently on the product page in most themes, and will also display on any collection pages. |
| − | === | + | === Product Variations === |
<gallery widths="200px" heights="200px" class="right"> | <gallery widths="200px" heights="200px" class="right"> | ||
| − | + | Image:Product-variations.png|Product variations | |
</gallery> | </gallery> | ||
| + | Variations could represent different sizes of a piece of clothing, different strains of sunflower seed, or different sizes of computer monitor. Each variation has its own price, weight, and inventory record, but they all share the same product page which lets the customer choose which one they want to buy. You can only add variations in the product management screen, after you have already added the product. | ||
| − | + | You can always decide to create a new product for every variation of this product, but this can result in a lot of time wasted for your customers as they browse your ecommerce store looking for exactly what they want. It's all up to you, but a good rule of thumb for many stores is to group products as variations when a single product description could fit for all of them. | |
| − | |||
| − | |||
| − | |||
| − | |||
| − | + | If your variations have visual characteristics which distinguish them from one another, then you may want to add an image to your product for each variation so that your customers can see exactly what they're going to get. | |
| − | |||
| − | |||
| − | + | As a rule of thumb, a product will need a variation for each physical version of the product that you are stocking. | |
| − | + | Every product must have at least one variation. If a product has only one variation, the variation should have a title of "Default". If a product has more than one variation, then each variation can be given a title that represents the physical differences. For example, the variation title can be a colour, a size or a fabric, or combinations of physical attributes. | |
| − | < | + | <html> |
| − | + | <h1>Adding a product with variations</h1> | |
| − | </ | + | <div style="padding:57.35% 0 0 0;position:relative;"><iframe src="https://player.vimeo.com/video/572388901?badge=0&autopause=0&player_id=0&app_id=58479" frameborder="0" allow="autoplay; fullscreen; picture-in-picture" allowfullscreen style="position:absolute;top:0;left:0;width:100%;height:100%;" title="Adding a product with sizes and colours"></iframe></div><script src="https://player.vimeo.com/api/player.js"></script> |
| + | </html> | ||
| − | + | If you can't see the video above, you can also view it on [https://vimeo.com/572388901 Vimeo ] | |
| − | + | <br> | |
| + | === Product Variation Titles === | ||
| + | <br> | ||
<gallery widths="200px" heights="200px" class="right"> | <gallery widths="200px" heights="200px" class="right"> | ||
| − | + | Image:Product-variations.png|Product variations | |
</gallery> | </gallery> | ||
| + | Rather than display options with a label of "Title" in your store, you can change the label to display whatever text you like. | ||
| − | + | # Click the '''Edit variation titles''' link<br><br> | |
| + | # Click '''Rename''' next to your current option name<br><br> | ||
| + | # Enter your new title<br><br> | ||
| + | # Click the '''Save Options''' button | ||
| − | + | <br><br> | |
| + | If you have a product that's available in multiple sizes and colours, you can create multiple options for your customers to select from. | ||
| − | + | # Click the '''Edit variation titles''' link<br><br> | |
| + | # In the new window, click '''Add new variation option'''<br><br> | ||
| + | # Select or enter your new title. e.g. Colour<br><br> | ||
| + | # Enter a default value e.g. Blue<br><br> | ||
| + | # Click the '''Save Options''' button<br><br> | ||
| − | + | When you have your base selection set up, you can then add more colours/sizes according to what you have available and the fields for size and colour will appear when adding your variations. | |
| − | |||
| − | |||
| − | |||
| − | |||
| − | |||
| − | |||
| − | |||
| − | |||
| − | |||
| − | |||
| − | |||
| − | |||
| − | |||
| − | |||
| − | |||
| − | |||
| − | |||
| − | |||
| − | |||
| − | |||
| − | |||
| − | |||
| − | |||
| − | |||
| − | |||
| − | |||
| − | |||
| − | |||
| − | + | <br><br> | |
| − | + | ==== Adding or editing product variations ==== | |
| − | + | <br> | |
| − | + | <gallery widths="200px" heights="200px" class="right"> | |
| − | + | Image:Product-variations.png|Product variations | |
| − | + | </gallery> | |
| − | + | Once you have created a product, you can then edit it and add new product variations (such as sizes or colours) by clicking on the "Add a new variation" link under the "Product Variations" title and list of current variations. | |
| − | |||
| − | |||
| − | |||
| − | |||
| − | |||
| − | |||
| − | |||
| − | |||
| − | |||
| − | |||
| − | |||
| − | |||
| − | |||
| − | |||
| − | |||
| − | |||
| − | |||
| − | |||
| − | |||
| − | |||
| − | |||
| − | |||
| − | |||
| − | |||
| − | |||
| − | |||
| − | |||
| − | |||
| − | |||
| − | |||
| − | |||
| − | |||
| − | : | ||
| − | |||
| − | |||
| − | |||
| − | |||
| − | |||
| − | |||
| − | |||
| − | |||
| − | |||
| − | |||
| − | |||
| − | |||
| − | |||
| − | |||
| − | |||
| − | |||
| − | |||
| − | |||
| − | |||
| − | |||
| − | |||
| − | |||
| − | |||
| − | |||
| − | |||
| − | |||
| − | |||
| − | |||
| − | |||
| − | |||
| − | |||
| − | |||
| − | |||
| − | |||
| − | |||
| − | |||
| − | |||
| − | |||
| − | |||
| − | |||
| − | |||
| − | |||
| − | |||
| − | |||
| − | |||
| − | |||
| − | |||
| − | |||
| − | |||
| − | |||
| − | + | Alternatively, you can edit an existing variation, by clicking on the variation row in the list of current variations. | |
| − | + | When you do either of these things, a variation dialog box will appear on your screen which will allow you to add or edit fields for your variation. | |
| − | + | The variation dialog box is divided into three parts, "Pricing", "Shipping" and "Inventory" and you can select each section by clicking on the relevant heading to open up the form fields for that section. | |
| − | ===== | + | ===== Pricing ===== |
<gallery widths="200px" heights="200px" class="right"> | <gallery widths="200px" heights="200px" class="right"> | ||
| − | + | Image:Variation edit 1.png|Editing a variation - Pricing | |
</gallery> | </gallery> | ||
| − | The | + | The fields in the "Pricing" section describe how much the customer must pay for a variation, including other pricing information. |
| − | |||
| − | |||
| − | + | ; Title | |
| + | : The first field in the pricing section is the title of the variation. When there is only one variation, the variation should be titled "Default". Otherwise, select a description of the attribute(s) that make this variation different from the other product variations. The title attribute can be renamed and this is done by editing the product and selecting from one of the predefined attributes, or by adding your own custom attribute. | ||
| + | ; SKU | ||
| + | : The "SKU" is optional and allows you to specify a Stock Keeping Unit identifier for this variation. | ||
| + | ; Barcode | ||
| + | : The barcode is optional, but may be required by some product data feeds, such as Google Merchant Center. Specify the UPC/EAN or ISBN number of the product. | ||
| + | ; Price | ||
| + | : The variation's "Price" is a required field. This is the price that the customer must pay. | ||
| + | ; Original price | ||
| + | : The "Original price" is used for price comparison to let your customers know how much they are saving when comparing the price with the recommended retail price available elsewhere or the normal price when products are on sale. | ||
| + | ; Cost price (Advanced setting) | ||
| + | : The wholesale or cost price of the item can be recorded here. | ||
| + | ; Discount | ||
| + | : The "Discount" field is used to specify a discount amount that is applied to the variation when it is eligible for a shopping cart discount. This field is optional and is only used when you offer shopping cart discounts that use a fixed discount price rather than a percentage or flat amount discount. | ||
| + | ; Tax Free item | ||
| + | : Finally, you can indicate whether this variation is tax free or not. You do not need to charge tax on a variation if this item is regarded as tax free. For example, some goods such as food items may be tax free in some countries. Some small businesses and sole traders do not need to register for GST or sales tax purposes and do not need to account for taxes in their sales. Whether your business is registered or not has no impact on the tax setting for a product variation. The item should be marked as tax free only if it really is regarded as tax free by your local tax legislation. | ||
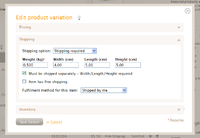
| − | ===== | + | ===== Shipping ===== |
<gallery widths="200px" heights="200px" class="right"> | <gallery widths="200px" heights="200px" class="right"> | ||
| − | + | Image:Variation edit 2.png|Editing a variation - Shipping | |
| − | </gallery> | + | </gallery> |
| − | + | This section allows you to specify all of the shipping options for a variation. | |
| − | The | + | ; Shipping option |
| + | : The first option you have in this section is to determine whether or not shipping is required for this variation. | ||
| + | : Shipping is not required for services or items that can be delivered electronically. Shipping is usually only required for physical goods that require delivery. | ||
| + | ; Weight | ||
| + | : If shipping is required, then you need to specify a weight for the variation. | ||
| + | ; Width/Length/Height | ||
| + | : Optionally you can also specify the width, length and height of the item. The dimensions are used if the item is bulky and requires separate shipping. Most shipping agents use a volumetric weight calculation for bulky items as the shipping cost is determined by the space the item occupies rather than just its weight. | ||
| + | ; Shipping Code (Advanced) | ||
| + | : If this item requires a special shipping rate, then the shipping rate code can be specified here. | ||
| + | ; Ship Separately | ||
| + | : When using a shipping agent to calculate the shipping rates, you can specify that an item requires separate shipping, and in this case, the shipping rate calculation is performed separately for this item. The Width/Length/Height values must be provided. | ||
| + | ; Free shipping | ||
| + | : An item can have free shipping, but this is only available to countries and regions that have been configured to accept free shipping options. The free shipping option for countries and regions is configured in the "Shipping & handling" section of the "Preferences". | ||
| − | + | When you have one or more fulfilment services configured, an additional selection box will appear that will enable you to specify which fulfilment service to use for this variation. | |
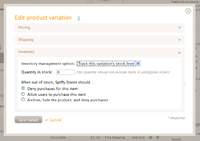
| − | ===== | + | ===== Inventory ===== |
<gallery widths="200px" heights="200px" class="right"> | <gallery widths="200px" heights="200px" class="right"> | ||
| − | + | Image:Variation edit 3.png|Editing a variation - Inventory | |
| − | </gallery> | + | </gallery> |
| − | |||
| − | |||
| − | + | The inventory section allows you to configure the inventory options for this variation. | |
| − | + | If you choose to track the inventory for the variation, then you need to specify the quantity of items that you have in stock and available for sale. | |
| − | |||
| − | |||
| − | |||
| − | |||
| − | + | Secondly, you need to specify the action to be taken when the item has sold out. | |
| − | + | The following "out of stock" options are available to determine what happens when a customer attempts to purchase a variation with a zero stock level: | |
| − | + | * Prevent further purchases of this variation until it has been restocked. | |
| + | * Allow purchases even if you do not have any items currently in stock. | ||
| + | * Select the "Archive" option which prevents further purchases of the item, but also automatically hides the product so that it is no longer visible to your customers. The archive option is useful for limited availability or one-off items that cannot be restocked. | ||
| − | + | '''Note:''' If you select the "Archive" option and the product has multiple variations then if the variation sells out, the whole product will be hidden, even if there is stock available for other variations. | |
| − | + | Optionally, a Location Code can be specified. The location code can be used to specify a physical location for the item, such as a row or shelf number, or some other label that lets you know where the item is located in your inventory. The packing list and order view will be sorted in Location Code order, so that you will be able to find all the items in the order that are physically in the same location. This makes picking large orders significantly easier. | |
| − | |||
| − | |||
| − | + | === Custom Options === | |
| − | + | Custom Options are useful for products that can be customized or created after they have been ordered by the customer. In this case you often don't have a physical item in your inventory, but will create or modify the product after the customer has selected the options and ordered the product. | |
| − | + | Read more about Custom Options on the [[Custom_Product_Options|Custom product options page.]] | |
Latest revision as of 12:14, 29 May 2023
The Products section is where you can see all the products that populate your ecommerce store. You can add new items here, and organise the product list using the controls on the sidebar. If you want to see how much of each product you have in stock, the sidebar also has a link to your inventory overview
Adding New Products
If you can't see the video above, you can also view it on Vimeo
After clicking the "Add a new product" link, just fill in the appropriate fields with your product information and hit the Save product button. In order to be easily accessible to your customers, a product then needs to be "added to a collection" which is "linked from within your shop".
The only fields that you absolutely have to fill in before saving your product are Title, Product type, and Product Vendor, but you'll almost certainly want to enter more information than that. You will also need to specify the price and weight for the default variation.
Hints for Adding New Products
Here are some tips for entering product information:
- SKU (Stock keeping unit)
- An SKU is a unique identifier for each of your product entries and "variants" which you can use to better organise your inventory. You don't have to use SKU numbers, but they can be very helpful especially if your inventory gets to be large. There are a number of different ways you can write SKUs, but you should really stick to the same format for each of your products.
You can make up your own SKU's, but for data feeds it's sometimes best to use the barcode number on a product if that product comes with a bar code. - Track this variation's stock level
- If this option is selected, it means you want to keep track of how many individual products of this type you have available to sell. If you know that you will always have stock easily available for sale, then you can choose "Don't track stock level" instead. Otherwise, it's a good idea to keep track of your stock even if it doesn't take you long to make more of the product available.
- Deny/allow out-of-stock purchases
- This choice should depend on how much time it takes you to restock. If you are selling glossy prints of a painting that you just finished, for example, you could allow people to always order more because the prints don't take you long to make. On the other hand, you would probably want to restrict people from ordering any more rare packages of baseball cards from the 1950s if you've just sold the last one you have.
- Tag your item
- Customers can find products with particular tags using your store's search page, and they are also used to display related items. You have complete control over how you want to tag each product: a pair of jeans could be tagged with "classic blue denim," or instead with "casual rugged pants," or you could use all of these. One important thing to remember is that you should reuse tags between products as much as possible by using your list of existing tags.
You probably don't want to end up with a "tshirts" tag and a "t-shirt" tag, for instance, because your customers would have to select both of them in order to see all of your t-shirts in a given collection. In fact, you may want to limit the number of tags in your ecommerce store to just a handful.
When entering your product tags, they should be separated by commas.
Product Tags are also used in the keyword meta tags for SEO purposes.". - Weight
- This is used to calculate shipping costs, so it's good to be as accurate as possible.
- Original price
- If you want to brag about how much better your prices are compared to your competition, you can use this field to tell your customers just how much those swindlers are charging for the same product. Alternatively, you could use your "Original price" to represent your "regular" price when you want to put a product on sale. You will need to make sure that the "theme" you are using displays the original price in such a way that it expresses the intended meaning.
- Location Code
- This optional field can be used to indicate where you store the item in your inventory. It may be something like a shelf or box number, or some other identifier that will enable you to find the item quickly. The packing list and order view will be sorted in location code order, so that all items located in the same location will appear together, making order fulfilment easier.
The units of measurement and form of currency used by the new product form are set automatically depending on the country selected during account creation, but the defaults can be changed in your "General Settings" page.
Formatting your content

Textile guide to formatting your content

We introduced a WYSIWYG editor in 2020, which makes it much easier to format your text.
You can also use HTML in the editor if you click the "Source Code" button. In the new editor, right click is disabled for copy & paste, so you'll need to use your computer's shortcut keys...
COPY SHORTCUT KEYS ARE CTRL C
PASTE SHORTCUT KEYS ARE CTRL V
Editing your product information
After adding a new product to your online store or by clicking on the product's icon in the main product list, you are able to edit any aspect of the item. In addition to the things you can change when first adding the product, there are a couple of new options which aren't available on the add product, such as reordering product images.
Image Management
To entice people to buy your product, you should upload at least one or two photos of the product. For best results, images should be re-sized before uploading. As a general guide, images that are about 1280 pixels wide on their longest side are the best size to upload, as they are faster to upload, and still display as large images when people view them in your online store. Spiffy Stores automatically re-sizes images to fit in different areas of your store, as in some cases a smaller image is needed (like on collection pages), and other times a larger image is needed (like on a product page).
You are able to drag and drop each of your product's images to put them in any order you like. The first image is labeled as "featured" and will be displayed more prominently on the product page in most themes, and will also display on any collection pages.
Product Variations

Product variations

Variations could represent different sizes of a piece of clothing, different strains of sunflower seed, or different sizes of computer monitor. Each variation has its own price, weight, and inventory record, but they all share the same product page which lets the customer choose which one they want to buy. You can only add variations in the product management screen, after you have already added the product.
You can always decide to create a new product for every variation of this product, but this can result in a lot of time wasted for your customers as they browse your ecommerce store looking for exactly what they want. It's all up to you, but a good rule of thumb for many stores is to group products as variations when a single product description could fit for all of them.
If your variations have visual characteristics which distinguish them from one another, then you may want to add an image to your product for each variation so that your customers can see exactly what they're going to get.
As a rule of thumb, a product will need a variation for each physical version of the product that you are stocking.
Every product must have at least one variation. If a product has only one variation, the variation should have a title of "Default". If a product has more than one variation, then each variation can be given a title that represents the physical differences. For example, the variation title can be a colour, a size or a fabric, or combinations of physical attributes.
Adding a product with variations
If you can't see the video above, you can also view it on Vimeo
Product Variation Titles
Product variations
Rather than display options with a label of "Title" in your store, you can change the label to display whatever text you like.
- Click the Edit variation titles link
- Click Rename next to your current option name
- Enter your new title
- Click the Save Options button
If you have a product that's available in multiple sizes and colours, you can create multiple options for your customers to select from.
- Click the Edit variation titles link
- In the new window, click Add new variation option
- Select or enter your new title. e.g. Colour
- Enter a default value e.g. Blue
- Click the Save Options button
When you have your base selection set up, you can then add more colours/sizes according to what you have available and the fields for size and colour will appear when adding your variations.
Adding or editing product variations
Product variations
Once you have created a product, you can then edit it and add new product variations (such as sizes or colours) by clicking on the "Add a new variation" link under the "Product Variations" title and list of current variations.
Alternatively, you can edit an existing variation, by clicking on the variation row in the list of current variations.
When you do either of these things, a variation dialog box will appear on your screen which will allow you to add or edit fields for your variation.
The variation dialog box is divided into three parts, "Pricing", "Shipping" and "Inventory" and you can select each section by clicking on the relevant heading to open up the form fields for that section.
Pricing

Editing a variation - Pricing

The fields in the "Pricing" section describe how much the customer must pay for a variation, including other pricing information.
- Title
- The first field in the pricing section is the title of the variation. When there is only one variation, the variation should be titled "Default". Otherwise, select a description of the attribute(s) that make this variation different from the other product variations. The title attribute can be renamed and this is done by editing the product and selecting from one of the predefined attributes, or by adding your own custom attribute.
- SKU
- The "SKU" is optional and allows you to specify a Stock Keeping Unit identifier for this variation.
- Barcode
- The barcode is optional, but may be required by some product data feeds, such as Google Merchant Center. Specify the UPC/EAN or ISBN number of the product.
- Price
- The variation's "Price" is a required field. This is the price that the customer must pay.
- Original price
- The "Original price" is used for price comparison to let your customers know how much they are saving when comparing the price with the recommended retail price available elsewhere or the normal price when products are on sale.
- Cost price (Advanced setting)
- The wholesale or cost price of the item can be recorded here.
- Discount
- The "Discount" field is used to specify a discount amount that is applied to the variation when it is eligible for a shopping cart discount. This field is optional and is only used when you offer shopping cart discounts that use a fixed discount price rather than a percentage or flat amount discount.
- Tax Free item
- Finally, you can indicate whether this variation is tax free or not. You do not need to charge tax on a variation if this item is regarded as tax free. For example, some goods such as food items may be tax free in some countries. Some small businesses and sole traders do not need to register for GST or sales tax purposes and do not need to account for taxes in their sales. Whether your business is registered or not has no impact on the tax setting for a product variation. The item should be marked as tax free only if it really is regarded as tax free by your local tax legislation.
Shipping
Editing a variation - Shipping

This section allows you to specify all of the shipping options for a variation.
- Shipping option
- The first option you have in this section is to determine whether or not shipping is required for this variation.
- Shipping is not required for services or items that can be delivered electronically. Shipping is usually only required for physical goods that require delivery.
- Weight
- If shipping is required, then you need to specify a weight for the variation.
- Width/Length/Height
- Optionally you can also specify the width, length and height of the item. The dimensions are used if the item is bulky and requires separate shipping. Most shipping agents use a volumetric weight calculation for bulky items as the shipping cost is determined by the space the item occupies rather than just its weight.
- Shipping Code (Advanced)
- If this item requires a special shipping rate, then the shipping rate code can be specified here.
- Ship Separately
- When using a shipping agent to calculate the shipping rates, you can specify that an item requires separate shipping, and in this case, the shipping rate calculation is performed separately for this item. The Width/Length/Height values must be provided.
- Free shipping
- An item can have free shipping, but this is only available to countries and regions that have been configured to accept free shipping options. The free shipping option for countries and regions is configured in the "Shipping & handling" section of the "Preferences".
When you have one or more fulfilment services configured, an additional selection box will appear that will enable you to specify which fulfilment service to use for this variation.
Inventory
Editing a variation - Inventory

The inventory section allows you to configure the inventory options for this variation.
If you choose to track the inventory for the variation, then you need to specify the quantity of items that you have in stock and available for sale.
Secondly, you need to specify the action to be taken when the item has sold out.
The following "out of stock" options are available to determine what happens when a customer attempts to purchase a variation with a zero stock level:
- Prevent further purchases of this variation until it has been restocked.
- Allow purchases even if you do not have any items currently in stock.
- Select the "Archive" option which prevents further purchases of the item, but also automatically hides the product so that it is no longer visible to your customers. The archive option is useful for limited availability or one-off items that cannot be restocked.
Note: If you select the "Archive" option and the product has multiple variations then if the variation sells out, the whole product will be hidden, even if there is stock available for other variations.
Optionally, a Location Code can be specified. The location code can be used to specify a physical location for the item, such as a row or shelf number, or some other label that lets you know where the item is located in your inventory. The packing list and order view will be sorted in Location Code order, so that you will be able to find all the items in the order that are physically in the same location. This makes picking large orders significantly easier.
Custom Options
Custom Options are useful for products that can be customized or created after they have been ordered by the customer. In this case you often don't have a physical item in your inventory, but will create or modify the product after the customer has selected the options and ordered the product.
Read more about Custom Options on the Custom product options page.