Difference between revisions of "Simple Theme - Creating banner images on collection pages"
From Spiffy Stores Knowledge Base
| (22 intermediate revisions by the same user not shown) | |||
| Line 2: | Line 2: | ||
==Step 1 - Creating your image== | ==Step 1 - Creating your image== | ||
| − | + | For consistency throughout the site, all banner images are set to be the same height and width as you have set the slideshow on your home page. If you have modified the size of the slideshow on your home page, you will need to ensure that your image sizes match those of your home page for consistent display. | |
| − | The banner images are all <b>in landscape format</b>, but if you have parallax enabled the best format to use is square images. If you use a portrait image, you'll be slowing down your site for an image that will likely look awful. | + | The banner images are all <b>in landscape format</b>, but if you have parallax enabled the best format to use is square images. If you use a portrait image, or an image that is not high enough quality, you'll be slowing down your site for an image that will likely look awful. |
| − | + | <gallery heights="300px" widths="300px" class="right"> | |
| − | If widescreen slideshow is enabled... | + | Image:Simple-ecommerce-theme-slideshow-settings-banner-size.png|Slideshow settings |
| − | # Create your banner image at 2048px x 2048px. This is so the banner can scale on all devices. | + | </gallery> |
| + | <br><br>If widescreen slideshow is enabled... | ||
| + | # Create your banner image at 2048px x 1200px. This is so the banner can scale on all devices. | ||
| + | # Give your banner image a descriptive name, so you'll know what it is later on. | ||
| + | <br> | ||
| + | If Parallax is <b>enabled</b> and widescreen slideshow is <b>enabled</b>... | ||
| + | # Create your banner image at 2048px x 2048px. This is so the banner can scale on all devices, and there is enough height in the image for scrolling effects. | ||
# Give your banner image a descriptive name, so you'll know what it is later on. | # Give your banner image a descriptive name, so you'll know what it is later on. | ||
| − | + | <br><br> | |
If widescreen slideshow is <b>not enabled</b>... | If widescreen slideshow is <b>not enabled</b>... | ||
# Create your banner image at 1200px x 550px. As widescreen is not enabled, the size will dynamically shrink to fit all devices. | # Create your banner image at 1200px x 550px. As widescreen is not enabled, the size will dynamically shrink to fit all devices. | ||
# Give your banner image a descriptive name, so you'll know what it is later on | # Give your banner image a descriptive name, so you'll know what it is later on | ||
| + | <br> | ||
| + | If Parallax is <b>enabled</b> and widescreen slideshow is <b>not enabled</b>... | ||
| + | # Create your banner image at 1200px x 1200px. This is so the banner can scale on all devices, and there is enough height in the image for scrolling effects. | ||
| + | # Give your banner image a descriptive name, so you'll know what it is later on. | ||
| + | |||
| + | <br> | ||
=== Using [http://pixlr.com/editor/ Pixlr] to create a banner image === | === Using [http://pixlr.com/editor/ Pixlr] to create a banner image === | ||
Pixlr is a free online image editing program, where you can edit your images in your web browser. | Pixlr is a free online image editing program, where you can edit your images in your web browser. | ||
| − | <gallery heights=" | + | <gallery heights="300px" widths="300px" class="right"> |
| − | Image: | + | Image:Pixlr-editor-crop.jpg|Pixlr editor |
</gallery> | </gallery> | ||
| − | #Go to the [ | + | # Go to the [https://pixlr.com/x/ Pixlr] editor |
| − | #Click " | + | # Click "Open image" to open an image from your computer |
| − | #Set the size recommended above | + | # Click the CROP icon |
| − | # | + | # Enable "Select Aspect" |
| − | # | + | # Select "Size |
| − | #Choose JPEG for your format, and set your quality to 80 | + | # Set the size recommended above |
| − | #When you've saved the file to your computer, upload it by following the instructions below. | + | # Drag the crop area around until you're happy with the cropping |
| + | # Click the "Apply" button | ||
| + | # Make any other adjustments you like and then save your image, ensuring you name it something that you'll easily be able to refer to later. | ||
| + | # Choose JPEG for your format, and set your quality to 80 | ||
| + | # When you've saved the file to your computer, upload it by following the instructions below. | ||
| + | <br> | ||
| + | <br> | ||
==Step 2 - Uploading your image== | ==Step 2 - Uploading your image== | ||
| − | ==Step | + | # Go to the "Design & assets -> Uploaded files" section in your store's admin<br><br>[[File:Simple-ecommerce-theme-upload-banner.png|800px]]<br><br><br> |
| − | The process to add | + | # Upload the image there<br><br>[[File:Simple-ecommerce-theme-upload-page.png|800px]] |
| + | |||
| + | |||
| + | <br> | ||
| + | <br> | ||
| + | |||
| + | ==Step 3 - Add the image to your page== | ||
| + | The process to add a banner image is very straightforward, and is unique to this theme. Simply edit the collection, and add the following code anywhere in the collection description field... | ||
| + | |||
| + | Note: You need to insert the code in code view in our new editor | ||
<pre><!--banner="your-banner-filename.jpg"--></pre> | <pre><!--banner="your-banner-filename.jpg"--></pre> | ||
| + | |||
| + | Replace "your-banner-filename.jpg" with the name of your actual image. | ||
| + | |||
| + | <br> | ||
| + | |||
| + | <br> | ||
| + | |||
| + | <br> | ||
| + | |||
| + | <br> | ||
| + | |||
| + | <br> | ||
| + | |||
| + | [[The Simple Theme Guide|« The Simple Ecommerce Theme Guide]] | ||
Latest revision as of 10:17, 5 November 2020
The Simple Theme allows you to have individual banner images on every collection, product, page, blog, and blog article. The process to add these in is very straightforward, and is unique to this theme. This tutorial will not work in other themes.
Contents
Step 1 - Creating your image
For consistency throughout the site, all banner images are set to be the same height and width as you have set the slideshow on your home page. If you have modified the size of the slideshow on your home page, you will need to ensure that your image sizes match those of your home page for consistent display.
The banner images are all in landscape format, but if you have parallax enabled the best format to use is square images. If you use a portrait image, or an image that is not high enough quality, you'll be slowing down your site for an image that will likely look awful.
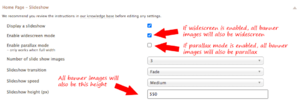
Slideshow settings

If widescreen slideshow is enabled...
- Create your banner image at 2048px x 1200px. This is so the banner can scale on all devices.
- Give your banner image a descriptive name, so you'll know what it is later on.
If Parallax is enabled and widescreen slideshow is enabled...
- Create your banner image at 2048px x 2048px. This is so the banner can scale on all devices, and there is enough height in the image for scrolling effects.
- Give your banner image a descriptive name, so you'll know what it is later on.
If widescreen slideshow is not enabled...
- Create your banner image at 1200px x 550px. As widescreen is not enabled, the size will dynamically shrink to fit all devices.
- Give your banner image a descriptive name, so you'll know what it is later on
If Parallax is enabled and widescreen slideshow is not enabled...
- Create your banner image at 1200px x 1200px. This is so the banner can scale on all devices, and there is enough height in the image for scrolling effects.
- Give your banner image a descriptive name, so you'll know what it is later on.
Using Pixlr to create a banner image
Pixlr is a free online image editing program, where you can edit your images in your web browser.
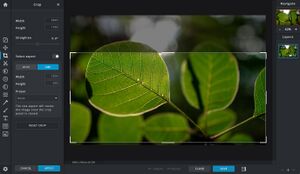
Pixlr editor

- Go to the Pixlr editor
- Click "Open image" to open an image from your computer
- Click the CROP icon
- Enable "Select Aspect"
- Select "Size
- Set the size recommended above
- Drag the crop area around until you're happy with the cropping
- Click the "Apply" button
- Make any other adjustments you like and then save your image, ensuring you name it something that you'll easily be able to refer to later.
- Choose JPEG for your format, and set your quality to 80
- When you've saved the file to your computer, upload it by following the instructions below.
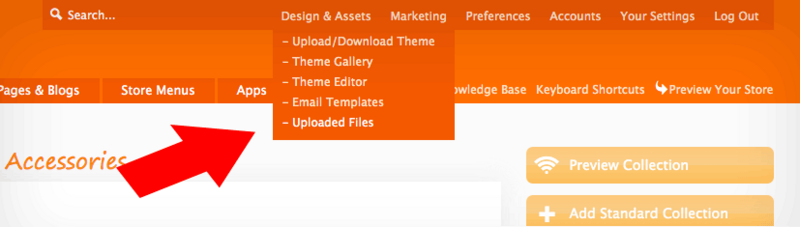
Step 2 - Uploading your image
- Go to the "Design & assets -> Uploaded files" section in your store's admin
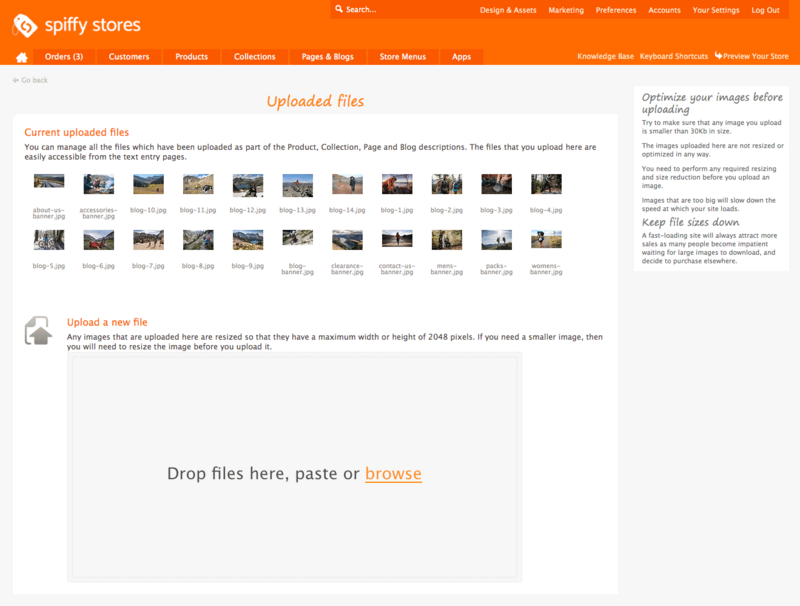
- Upload the image there


Step 3 - Add the image to your page
The process to add a banner image is very straightforward, and is unique to this theme. Simply edit the collection, and add the following code anywhere in the collection description field...
Note: You need to insert the code in code view in our new editor
<!--banner="your-banner-filename.jpg"-->
Replace "your-banner-filename.jpg" with the name of your actual image.