Difference between revisions of "Stripe Payment Gateway"
From Spiffy Stores Knowledge Base
(Created page with "The Stripe Payment Gateway allows your customers to enter their payment details in your own checkout... providing a seamless checkout experience, and resulting in less abandon...") |
m (→About Stripe) |
||
| (14 intermediate revisions by 2 users not shown) | |||
| Line 1: | Line 1: | ||
| − | + | <div style="float: right">[[File:Stripe-logo.png|right|300px]]</div> | |
| − | Stripe | + | The Stripe Payment Gateway allows your customers to enter their payment details in your own checkout… providing a seamless checkout experience, and resulting in less abandoned shopping carts. |
| + | |||
| + | Rather than the lengthy application process you go through with most banks to set up a merchant account, Stripe allows you to set up an account, and start selling as soon as you submit their simple account application! | ||
== Before Starting: You will need a Stripe account == | == Before Starting: You will need a Stripe account == | ||
| Line 14: | Line 16: | ||
# Go to the "Checkout & payment" page in the Preferences section | # Go to the "Checkout & payment" page in the Preferences section | ||
# In the "Credit Card Gateways" section, choose "Stripe" | # In the "Credit Card Gateways" section, choose "Stripe" | ||
| − | # Select the cards you accept | + | # Select the cards you accept. Please note that if you are in Australia, you cannot accept American Express payments through Stripe at this time. |
# Click the "Activate" button. | # Click the "Activate" button. | ||
# Go to Part 2 below | # Go to Part 2 below | ||
| + | [[File:Stripe-payment-gateway-kb.jpg]] | ||
| − | + | == Part 2 - Configure your Stripe Account == | |
| + | # Once you've clicked the "Activate" button in your Spiffy Store, you will be redirected to the Stripe site | ||
| + | # Log in to Stripe (if you haven't already done so) and you will be asked to grant permissions to Spiffy Stores so that we can use their API to configure your account to use Stripe in your Checkout. You may also need to complete some account details for Stripe to approve your account with them. | ||
| + | # Click the "Authorize access to this account" button. | ||
| + | After you've followed the steps above, your Spiffy Store should now be set up to accept payments through the Stripe Payment Gateway. It's likely that Stripe will contact you to follow up if they require any further details for your account. | ||
| + | == 3D Secure Fraud Protection == | ||
| + | 3D Secure is an optional process that can improve the protection you receive, as a merchant, against fraudulent transactions. | ||
| − | + | Typically. when a transaction is enabled for 3D Secure protection, it takes the customer through an additional verification process via an authentication page controlled by the bank that issued the card. This authentication step usually requires the customer to enter some sort of one-time security code that is sent to them via an SMS Text Message, email, a pre-assigned password or perhaps an installed app on their phone. The customer will need to enter this code in the pop-up form that is presented at the end of the checkout process. A valid code is required to complete the transaction. | |
| − | + | It's important to note that, in many cases, there's a shift in liability from the merchant to the bank for cases involving fraud where 3D Secure authentication has been used. For a merchant, especially where expensive physical goods are involved, there's a huge benefit available from enabling 3D Secure authentication wherever possible, as this gives you much greater protection against fraudulent transactions. Of course, there's a risk that the additional authentication step may lead to more transactions being abandoned, so it may not be worthwhile enabling 3D Secure for small transactions. | |
| − | |||
| − | |||
| + | === Enabling 3D Secure Protection === | ||
| + | <gallery widths="200px" heights="200px" class="right"> | ||
| + | Image:stripe_3d_secure1.png|Update 3D Secure Rules | ||
| + | </gallery> | ||
| + | By default, your Stripe account will only initiate 3D Secure protection for transactions that require or recommend additional verification by the issuing bank. This means that unless you specifically configure your Stripe account to do otherwise, you're not likely to see many transactions taking advantage of this additional level of protection. | ||
| − | + | Your Stripe account comes with basic fraud protection, and you can view the settings from the Settings page, in the section labelled 'Radar'. In the Radar rules section, you can then enable a default rule that will submit all eligible transactions for additional 3D Secure authentication. | |
| + | === Upgrading to Radar for Fraud Teams === | ||
| + | <gallery widths="200px" heights="200px" class="right"> | ||
| + | Image:stripe_3d_secure2.png|Update 3D Secure Rules | ||
| + | </gallery> | ||
| + | You'll see an option in the Radar section of your settings page that offers a free trial for "Radar for Fraud Teams". This option enables you to create and manage a greater range a fraud detection rules to help you fine tune your fraud management. | ||
| − | + | This is useful in the 3D Secure context, for example, as it allows you to add specific rules to only enable 3D Secure on certain transactions, such as transactions greater than a specific value. | |
| + | <pre> | ||
| + | Request 3D Secure if :amount_in_aud: > 50.00 | ||
| + | </pre> | ||
| − | + | The full range of options available for creating rules can be accessed here https://stripe.com/docs/radar/rules/reference | |
| − | + | There is an additional charge for enabling "Radar for Fraud Teams", but for most accounts, it's a nominal charge of a couple of cents per transaction. The added value that it gives to enable you to manage your 3D Secure and fraud detection environment is probably worth the cost, especially if it helps you to avoid major losses when shipping expensive items. | |
| − | + | == About Stripe == | |
| + | Stripe currently supports businesses in the US, Canada, UK, Australia and many European countries. You can instantly accept payments from around the world. | ||
| − | + | Businesses that are based in Australia are able to link an Australian AUD bank account to their Stripe account. | |
| + | When linking an AUD bank account to your Stripe account, we’ll request that you provide your Bank State Branch (BSB) and account numbers. Your BSB number tells us which bank you use, and which branch of that bank your account is located in. Your account number then tells us the specific account where your funds are to be sent. | ||
| − | + | Your AUD bank account must be based in Australia, and should support BECS transfers (most banks in Australia support this). | |
| − | For more information about | + | For more information about Stripe please feel free to visit the Stripe website at https://stripe.com |
Latest revision as of 12:02, 9 November 2020
The Stripe Payment Gateway allows your customers to enter their payment details in your own checkout… providing a seamless checkout experience, and resulting in less abandoned shopping carts.
Rather than the lengthy application process you go through with most banks to set up a merchant account, Stripe allows you to set up an account, and start selling as soon as you submit their simple account application!
Contents
Before Starting: You will need a Stripe account
To enable the Stripe Payment Gateway, you will need to have a Stripe account. If you don't have a Stripe account, click here to sign up, and then return to this page.
Part 1 - Set up the Stripe Payment Gateway in your Spiffy Store
Follow the steps below to enable the Stripe Payment Gateway in your store.
- Log into your Spiffy Store Toolbox
- Go to the "Checkout & payment" page in the Preferences section
- In the "Credit Card Gateways" section, choose "Stripe"
- Select the cards you accept. Please note that if you are in Australia, you cannot accept American Express payments through Stripe at this time.
- Click the "Activate" button.
- Go to Part 2 below

Part 2 - Configure your Stripe Account
- Once you've clicked the "Activate" button in your Spiffy Store, you will be redirected to the Stripe site
- Log in to Stripe (if you haven't already done so) and you will be asked to grant permissions to Spiffy Stores so that we can use their API to configure your account to use Stripe in your Checkout. You may also need to complete some account details for Stripe to approve your account with them.
- Click the "Authorize access to this account" button.
After you've followed the steps above, your Spiffy Store should now be set up to accept payments through the Stripe Payment Gateway. It's likely that Stripe will contact you to follow up if they require any further details for your account.
3D Secure Fraud Protection
3D Secure is an optional process that can improve the protection you receive, as a merchant, against fraudulent transactions.
Typically. when a transaction is enabled for 3D Secure protection, it takes the customer through an additional verification process via an authentication page controlled by the bank that issued the card. This authentication step usually requires the customer to enter some sort of one-time security code that is sent to them via an SMS Text Message, email, a pre-assigned password or perhaps an installed app on their phone. The customer will need to enter this code in the pop-up form that is presented at the end of the checkout process. A valid code is required to complete the transaction.
It's important to note that, in many cases, there's a shift in liability from the merchant to the bank for cases involving fraud where 3D Secure authentication has been used. For a merchant, especially where expensive physical goods are involved, there's a huge benefit available from enabling 3D Secure authentication wherever possible, as this gives you much greater protection against fraudulent transactions. Of course, there's a risk that the additional authentication step may lead to more transactions being abandoned, so it may not be worthwhile enabling 3D Secure for small transactions.
Enabling 3D Secure Protection
Update 3D Secure Rules

By default, your Stripe account will only initiate 3D Secure protection for transactions that require or recommend additional verification by the issuing bank. This means that unless you specifically configure your Stripe account to do otherwise, you're not likely to see many transactions taking advantage of this additional level of protection.
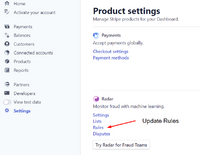
Your Stripe account comes with basic fraud protection, and you can view the settings from the Settings page, in the section labelled 'Radar'. In the Radar rules section, you can then enable a default rule that will submit all eligible transactions for additional 3D Secure authentication.
Upgrading to Radar for Fraud Teams

Update 3D Secure Rules

You'll see an option in the Radar section of your settings page that offers a free trial for "Radar for Fraud Teams". This option enables you to create and manage a greater range a fraud detection rules to help you fine tune your fraud management.
This is useful in the 3D Secure context, for example, as it allows you to add specific rules to only enable 3D Secure on certain transactions, such as transactions greater than a specific value.
Request 3D Secure if :amount_in_aud: > 50.00
The full range of options available for creating rules can be accessed here https://stripe.com/docs/radar/rules/reference
There is an additional charge for enabling "Radar for Fraud Teams", but for most accounts, it's a nominal charge of a couple of cents per transaction. The added value that it gives to enable you to manage your 3D Secure and fraud detection environment is probably worth the cost, especially if it helps you to avoid major losses when shipping expensive items.
About Stripe
Stripe currently supports businesses in the US, Canada, UK, Australia and many European countries. You can instantly accept payments from around the world.
Businesses that are based in Australia are able to link an Australian AUD bank account to their Stripe account. When linking an AUD bank account to your Stripe account, we’ll request that you provide your Bank State Branch (BSB) and account numbers. Your BSB number tells us which bank you use, and which branch of that bank your account is located in. Your account number then tells us the specific account where your funds are to be sent.
Your AUD bank account must be based in Australia, and should support BECS transfers (most banks in Australia support this).
For more information about Stripe please feel free to visit the Stripe website at https://stripe.com