QuickBooks App Configuration
From Spiffy Stores Knowledge Base
QuickBooks (https://quickbooks.intuit.com/au) is an accounting software package developed and marketed by Intuit. QuickBooks products are geared mainly toward small and medium-sized businesses with cloud-based versions that accept business payments, manage and pay bills, and payroll functions.
Contents
Installing the App
You can access your installed Apps or install new Apps from the apps tab in your main toolbar.
Logging On
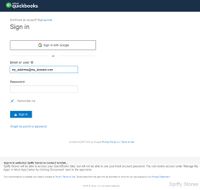
When you log in for the first time, you will need to provide your QuickBooks account credentials.
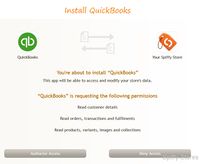
When you install the app for the first time, you will be prompted to approve the permissions that the app is requesting.
Authenticating with your QuickBooks Account
After approving the permissions that the app requires, you will need to connect to QuickBooks to authorize the installation. This authorization will give the app access to your Company data so that it can import the order data.
At this point, you need to enter your QuickBooks:
- Email Address or Userid
- Password
Confirm QuickBooks Account Access
Finally, you will need to confirm that you wish to proceed with the access and allow Spiffy Stores to access your company data.
Setting up Company Data
Once you have successfully authenticated with your QuickBooks account, the app will load the account data it needs from your Company data.
Initial Configuration
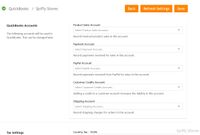
The QuickBooks App must be configured before it can be used, in order to map the QuickBooks accounts to the exported data.
The Settings page consists of a number of sections.
- QuickBooks Accounts
- Map QuickBooks Accounts to your store data
- Tax Settings
- Select correct tax setting for your sales
- Customer Export Settings
- Choose whether to export customer data
- Export Settings
- Email Notifications and Automatic Daily Export
You should probably ask your Accountant about the account mappings. You may need to add new accounts to QuickBooks, but your Accountant will be able to advise you about this.
Similarly, your Accountant will make sure that all of the correct Tax Codes have been defined for you, and will be able to assist you to choose the correct mappings for your store.
You can choose to include individual customer data with each order as it is exported to QuickBooks. Alternatively, you can choose to export all orders under a single generic customer if you don't want to include this data in your accounting software.
By default, the app will export your paid orders to QuickBooks and create a paid Invoice for the order.
Furthermore, an option for posting order data in real-time is also available. If you choose to send order data to QuickBooks immediately, then whenever an order is marked as paid, it is immediately posted to QuickBooks as a Paid Invoice.
Finally, if you provide an email address, you can be sent an export summary after each export run. You can also specify that an automatic export will take place every day after midnight to export the previous day's orders.
Finally, click Save to save your settings.
Items and Inventory Management
If an order includes a product that has an SKU recorded, then that SKU will be used to find an associated Product or Service that has a matching SKU. If the Product has Inventory Management feature enabled, then the stock level of the item will be reduced by the amount that has been ordered.
In addition, the revenue for each item in the order will be posted to the QuickBooks account associated with the matching Product or Service.
If an item does not have an SKU recorded, or the SKU cannot be found, then all items will be matched with a default item, Online Sales. If this item has not been already created in your QuickBooks account, then the item will be created when the app is connected for the first time.
Similarly, all revenues associated with Shipping charges will be posted to the default item, Online Shipping.
Manual Exports
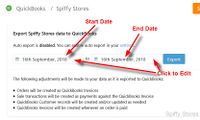
You can choose to manually export all paid orders to QuickBooks by clicking on each of the date fields to select a date range and then click on the Export button.
All orders that have been paid within this date range will be selected for export. Test orders will not be exported. Please note that the order will only be exported if the payment date for the order falls within the nominated date range. The date that the order was created is not relevant.
The export job may take a short time to complete, and a progress bar is displayed so that you can track the completion of the export job.
Once the export job has finished, a link will appear at the bottom that can be used to view the completed status of the export job. Additionally, if you have enabled email notifications, you will be sent a summary of the export job.
Automatic Exports
If you enable the Automatically Export Daily option in your App settings, then an export job will be run every day at some time after midnight in your local time zone. The job will automatically export all paid orders from the date of the last export job up until the day previous to the export job being run.
Limitations
Tax Calculations
QuickBooks calculates the tax on all taxed items using the net item price as the basis for its calculations. This practice derives from the fact that the software has been built by a US company, and this is standard for US tax calculations which generally add a sales tax to the published prices.
For non-US companies, GST and VAT prices are included in the published prices, so the calculated tax is derived from the tax included price.
These differences in approach mean that there will inevitably be a rounding error on some invoices. For this reason, you will sometimes find an additional line on the invoice for a rounding error adjustment to make sure that the invoice total and tax match the amounts that the customer has paid.
Merchant Fees
QuickBooks does not have a built-in method of easily dealing with payments from payment processing services where the merchant fee is deducted from each payment before it is deposited into your bank account.
When a payment is processed through a payment service such as PayPal or Stripe, for example, the net amount (less merchant fee) is deposited to your PayPal or nominated bank account. If your accounting software can deal with included merchant fees, then this fee can be recorded as part of the payment details, leaving you with a net amount to be reconciled with your Bank statements. Of course, this dramatically decreases the amount of time that you need to spend reconciling all your payments with the corresponding bank deposits.
Unfortunately, QuickBooks does not deal with this automatically, so will been to set up some sort of clearing account for your merchant fees, as all payments will be recorded as a gross value, whereas your bank deposits will all be net amounts.
Please refer to the QuickBooks documentation or your Accountant for advice on how to deal with Merchant Fees.


