Using Australia Post MyPost Business
From Spiffy Stores Knowledge Base
Spiffy Stores provides an easy to use integration with MyPost Business. There are a number of steps that you need to go through in order to connect your store to your Australia Post MyPost Business account.
You can read more about how the integration between Spiffy Stores and MyPost Business works here -
https://auspost.com.au/business/shipping/mypost-business/print-shipping-labels.
Australia Post have also provided a getting started guide on how to connect your store to your MyPost Business account and you can view it here -
Contents
1. Establish a MyPost Business account with Australia Post
You can sign up for a new account at https://auspost.com.au/business/shipping/mypost-business
You can pay for your shipments using a credit card or by using an existing Australia Post charge account. You will need to provide credit card details in order to proceed.
3. Submit a request for API access

Provide your account details

Please fill in the form with your contact details, including your Australia Post Parcel Contract Account number. This is the account that is used to charge for the shipments submitted via the API.
Also, please ensure that you request access to all three services, Tracking, Product Pricing and Lodgement and Label Printing.
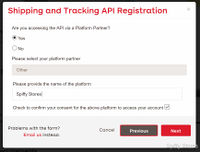
Connect to Spiffy Stores

On the following page of the form, please specify Spiffy Stores as the Platform Partner.
Once you're finished, submit the form for approval. Generally, you should expect to receive a reply within one business day.
4. Activate your API access

New Projects Menu Item

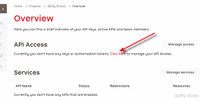
You'll receive an activation email from Australia Post once your request has been approved.
Just click on the Log in link in the email and you'll be taken to the Developer Center page, where you'll find that there's an additional Projects link in the toolbar.
If you don't receive a response from Australia Post, then you can send a follow-up email to Customer_Connectivity@auspost.com.au quoting your Parcel Contract account number and the email address you used to create your Developer Center Account.
5. Create your first project

Create a project

You need to follow the following steps in order to create a project.
Click on Create new project to begin.

Name the project

Give the project a name, such as Spiffy Stores, so that you'll know what the API key relates to.
Click Create project to create the project.
6. Create an API key
Create an API key

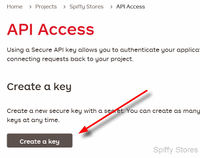
Create an API key

You don't have any API keys yet, so click on the links to create one.
7. Choose a name and a password for the API key
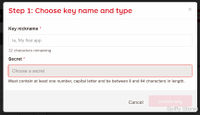
Choose a name and password

You need to choose a name and a password for the API key. The name can be something simple, like API Key 1.
Choose a password that is at least 8 characters long and contains at least one capital letter and one digit. Write the password down, as you'll need it later to activate your Parcel Contract fulfilment service in your store.
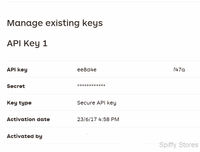
A generated API key

When the API key has been generated, you'll see it in the list of existing keys.
You'll also need the API Key value when you activate the eParcel fulfilment service in your store.
8. Enable the API Services
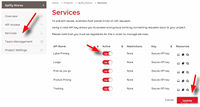
Enable Services

Next, you need to enable the services associated with the API key.
First, click on the Services link to go to the Services page.
Then, for each of the services listed, click on the On/Off switch to enable each one. Once they are all enabled, click on Update to save your changes.
It's recommended that you logoff from your account, and then login again to verify that everything is correct. Please check that all of the services have been enabled as requested.
Once this step is complete, you're ready to activate the eParcel fulfilment service in your store using your eParcel Account number, API Key and password.