Vintage theme - connecting your email subscriber form
From Spiffy Stores Knowledge Base
Connecting your email subscribe form

The Vintage theme allows you to connect the subscribe form in the footer to your MailChimp, FlashIssue or Mad Mimi account. The Default option adds the email address to the "Customers" in your store. Each subscriber is added as a customer with the name Prospective Customer. These customers can then be exported should you wish to use an unsupported bulk email provider.
For any of the services, you just select the service, and then paste the form's URL into the "Form action URL" field in your Theme editor.
URL's are entered in the "Store footer" section of your Theme editor. To get to your Theme editor, go to the "Design & Assets -> Theme editor" section of your store's Toolbox.
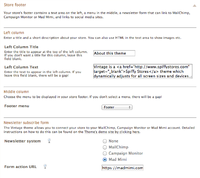
To add the subscribe form to your store, open the "Store footer" section of your theme editor, scroll down to the "Newsletter subscribe form" section, select the service you are using, paste the URL into the "Form action URL" box, and click the "Save settings" button.
Detailed instructions for setting up each service are below.
MailChimp
To use MailChimp log in to your MailChimp account. If you haven't already created a list there to add subscribers to, create one and then follow the instructions below;
- Click on "Audience" in the top menu.
- Under "Current Audience", select the list you want to use by clicking on it's name.
- In the "Manage Audience" drop-down menu, choose "Signup forms".
- Choose "Embedded forms".
- At the top of the screen, copy the text in the box labeled "Copy paste into your site" to get your form URL. Paste this code into a text editor, highlight ONLY the "form action" URL and copy the text. It should look something like this...
//hellothere.us4.list-manage.com/subscribe/post?u=747fc9927e6c1a5894eba5454&id=c9492288d0
Note that it begins with "//" and ends with "id=" followed by a special code. - Back in your theme editor, choose "MailChimp" in the "Newsletter system" section, and paste the URL into the "Form action URL" box.
- Click the "Save settings" button and test your form in your storefront.
- If entering your email address and clicking subscribe directs you to a MailChimp page asking you to confrim your email address, the form is working. If it doesn't, then you'll need to check the "Form action URL" field to make sure that there aren't any extra or missing characters at the beginning or end of your Form action URL.
- If you'd like to, you can also modify the design of your form in MailChimp by adding your logo and changing the colours to make it match your site.
Mad Mimi
To use Mad Mimi, log in to your Mad Mimi account. If you haven't already created a list there to add subscribers to, create one and then follow the instructions below;
- Click on the "Webform" link in the top left of your screen.
- Select the list you want to add subscribers to by clicking on it's name in the "Add subscribers to these lists" section on the right.
- Click the "Embed" link above your form preview.
- Choose the "Plain embed" tab.
- In the code window below, copy your form action URL. It should look something like this...
https://madmimi.com/signups/subscribe/12345
- Back in your theme editor, choose "Mad Mimi" in the "Newsletter system" section, and paste the entire URL into the "Form action URL" box.
- Click the "Save settings" button.
- If you'd like to, you can also create a confirmation page in your store, and then add a link to it in the "Confirmation Landing Page" section in Mad Mimi. You can also edit the confirmation email that is sent to your new subscriber, by clicking on the "Edit activation message" button.
FlashIssue
To use FlashIssue log in to your FlashIssue account. If you haven't already created a list there to add subscribers to, create one and then follow the instructions below;
- Click on "Lists" at the top.
- Select the list you want to use by clicking on it's name.
- At the top of the screen on the right, click on the "Sign Up forms" button.
- In the "Copy & Paste into your website" section, highlight ONLY the "form action" URL and copy the text. It should look something like this...
https://app.flashissue.com/subscribe/9edtlmQpNp
- Back in your theme editor, choose "FlashIssue" in the "Newsletter system" section, and paste the URL into the "Form action URL" box.
- Click the "Save settings" button and test your form in your storefront.
- If entering your email address and clicking subscribe directs you to a FlashIssue page asking you to confirm your email address, the form is working. If it doesn't, then you'll need to check the "Form action URL" field to make sure that there aren't any extra or missing characters at the beginning or end of your Form action URL.
Related pages
- The Vintage theme guide
- Vintage theme features
- Frequently asked questions
- Uploading your logo
- Selecting & modifying your colour scheme
- Selecting your title font
- Editing your store's menus
- Updating your home page
- Editing your slideshow
- Adding featured collections to your home page
- Adding featured collections on other pages
- Connecting your email subscriber form
- Enabling Facebook comments
- Connecting to your social media accounts (Facebook, Twitter, Google + etc.)
- Displaying icons for your accepted payment methods